Managing Customer Credit
OBJECTIVE
As part of the procedure of monitoring accounts receivable, the user must regularly ensure that customers do not exceed their credit limits or that invoices are collected on time.
Maestro* provides two methods for managing a customer's credit. Click one of the links below according to the method selected:
|
Method |
Impact in maestro* |
|---|---|
|
Automatically verify a customer's credit based on a credit limit |
Using this method, the user is only informed that the customer has exceeded his credit limit when he enters or attempts to transfer a sale. The customer is still ACTIVE. This means that other types of transactions can be entered in maestro* for this customer. Three steps are required to activate and use credit limit management: |
|
Using the Credit Validation option to block or unblock a customer |
This method offers greater flexibility because it lets the user block or unblock the customer based on the credit limit or authorized payment terms. Customers are blocked manually using the Credit Validation option and this must be done regularly. Depending on the settings in the Configuration option, a customer can be blocked completely or a warning message may be displayed when the customer is selected. Once a customer is blocked, new transactions cannot be entered for this customer. When the customer code is entered, the user is informed of the customer's status and why the customer has been blocked. Three steps are necessary to activate credit validation: |
PREREQUISITE
- Customer Management
- Configuration
- Sales transactions must have been entered for these customers
Steps
Method 1: Automatically verify a customer's credit based on a credit limit
With this method, the user is only informed that the credit limit has been reached when a sale is entered for this customer.
Depending on the settings in Configuration and the Credit Limit Management field, maestro* can:
- Prevent the user from entering or transferring a sale.
or - Display a warning message indicating that the customer has exceeded his credit limit when entering a sale.
Specifying when the credit limit should be checked in Configuration
This step must be performed when credit limit management is implemented. It is used to specify when the credit limit is check in maestro* for all customers.
|
maestro* > Invoicing > Maintenance > Invoicing > Configuration |
- From the menu on the left, click Customer.
- Select the method for checking the credit limit in the Credit Limit Management field, selecting where this should be done.
The choices Sale and Transfer allow you to block the entry or transfer of a sale when the customer's credit limit is reached.
However, the choice Sale - Validate Only warns the user when the credit limit is reached. In this case, the user can continue entering the sale after closing the warning message.
- Click Save and then Quit.
Specifying a customer's credit limit in Customer Management
This step is necessary to specify the credit limit assigned to each customer.
|
maestro* > Invoicing > Maintenance > Customer > Customer Management |
- Select an existing customer or create a new customer, as applicable.
- Enter the amount of the credit limit.

- Click Save and then Quit.
Checking the credit limit when entering a sale
If an invoice is entered for a customer and the amount of the invoice results in the customer's credit limit being exceeded:
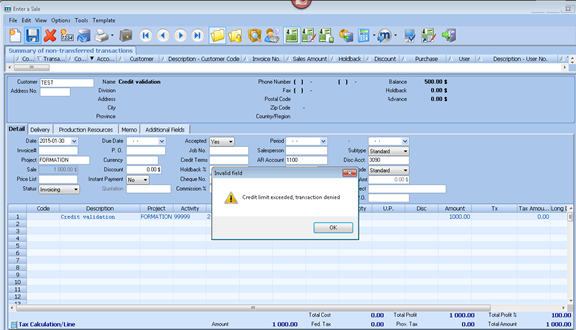
If the Credit Limit Management option is set to Sale, an error message is displayed and the user will not be able to enter the transaction.
- If the Credit Limit Management option is set to Sale - Validate Only, an error message is displayed, but the user will be able to enter the transaction.
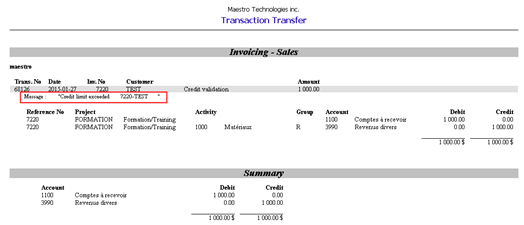
- If the Credit Limit Management option is set to Transfer, no warnings will be displayed when entering the invoice. However, when the user tries to transfer the invoice, a warning message will be displayed on the transfer report and the transaction will be also transferred.
Method 2: Using the Credit Validation option to block or unblock a customer
Defining the requirements for a credit validation in Configuration
This step is only required when credit validation is activated. It is used to define the method and criteria under which the credit validation should be performed for all customers.
|
maestro* > Invoicing > Maintenance > Invoicing > Configuration |
- From the menu on the left, click Customer.
- Complete the Credit Verification section based on your requirements by referring to the table below.
Credit is usually checked based on the authorized payment terms or according to the credit limit.
If you combine both verifications, maestro* suggests blocking a customer as soon as the customer meets at least one of these criteria.
Credit verification based on
To be used when
Action
Authorized Payment Terms
All of your customers have the same terms for paying an invoice.
Example: Up to 60 days to make a payment without penalty.
In the Validation based on the payment terms authorized section
- Enter the number of days from which the system should suggest blocking a customer with an outstanding balance, regardless of the amount.
Maestro* will suggest to automatically block customers who have at least one invoice that remains unpaid for longer than 60 days.
Customer's credit limit and minimum balance**
You want to block a customer if he exceeds the number of days in the payment exemption period and the outstanding balance of invoices exceeds the minimum balance set.
NOTE: Only invoices that exceed the payment terms specified are included in calculating the balance.
Prerequisite:
- A credit limit amount must be entered in Customer Management.
In the Validation based on the credit limit section
- Payment Terms
- Minimum Balance
Complete the following fields:
Maestro* automatically offers to block customers whose total outstanding balance that exceeds the number of days in the exemption period is higher than this minimum amount specified.
Customer's credit limit and a % of the credit limit**
You want to block a customer if he exceeds the number of days in the payment exemption period and the outstanding balance of invoices reaches a certain percentage of the specified credit limit.
NOTE: Only invoices that exceed the payment terms specified are included in calculating the balance.
Prerequisite:
- A credit limit amount must be entered in Customer Management.
In the Validation based on the credit limit section
Complete the following fields:
- Payment Terms
- Credit Limit %
Maestro* automatically offers to block customers whose total outstanding balance that exceeds the number of days in the exemption period reaches a percentage of the credit limit that is higher than the percentage specified.
This criterion overrides the verification based on a minimum balance indicated in this section. If a percentage is specified therein, the system does not take the minimum balance into consideration.
** If no credit limit is set for the customer, credit will not be checked if the validation method selected is based on the credit limit.
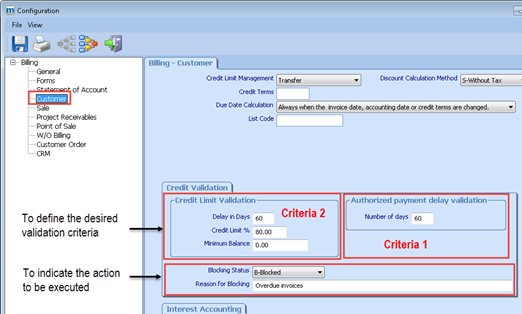
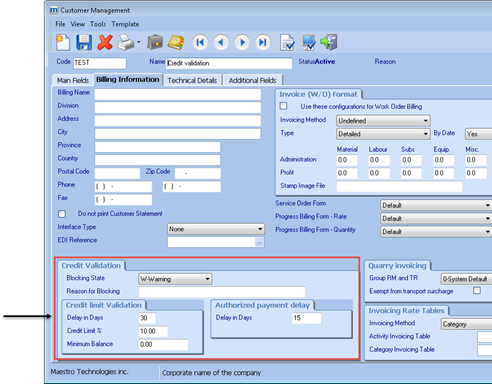
The fields below are used to define what action should be taken during the Credit Validation stage, if the invoice balance matches the criteria set out in the table of the screen capture above.
Field
Description
Blocking Status
Action to be performed using the Credit Validation option for customers who meet the conditions specified. Possible actions include blocking the customer or giving a warning.
Reason for Blocking
Message displayed if the stated conditions are met.
- Click Save and then Quit.
Managing exceptions in Customer Management
This step is required if you assign a specific condition to a customer for credit validation. This is also where the credit limit must be specified for each customer if the credit verification is based on the customer's credit limit.
|
maestro* > Invoicing > Maintenance > Customer > Customer Management |
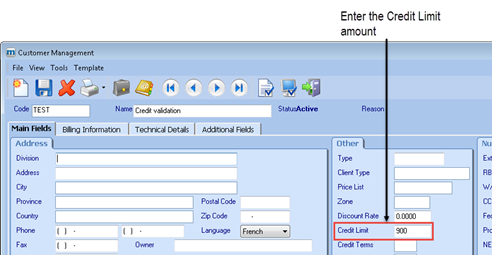
- Select an existing customer or create a new customer, as applicable.
- If the credit verification is conducted based on the customer's credit limit, enter the amount of the limit.
- To define the specific conditions related to the customer, click the Billing Information tab and complete the Credit Validation section.
- Click Save and Quit.
Checking customer credit
The Credit Validation function is used to check the status of customers based on the credit criteria set up in Customer Management and/or Configuration. Outstanding balances are always calculated based on the current date.
Maestro* provides the ability to automatically block customers that meet the credit validation criteria. The user can approve the selected customers in batches, change the selection made by the system or change the action to be performed.
|
This step must be performed regularly. |
- From the main maestro* menu, in the section on the left, click the Invoicing module, then click Maintenance. The Maintenance menu is displayed in the section on the right.
- In the section on the right, click the Credit Validation option in the Customers Maintenance panel. The Credit Validation screen is displayed.
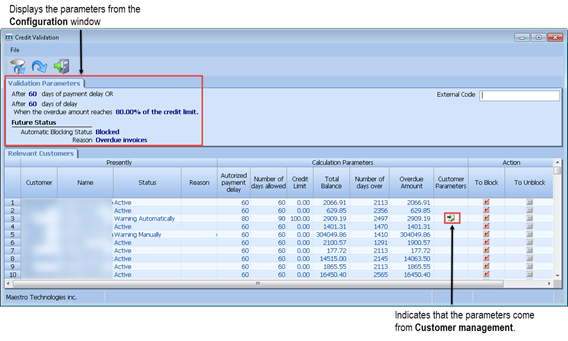
Only the columns in the Action section can be changed.
|
For additional information on the various fields, consult help by pressing F1 in the Credit Validation option. |
Change the status of a customer
- If necessary, enter an External Code to filter transactions to be displayed. Next click the Filter data according to specified parameters icon.
This code is linked to the content in the External Code field in Customer Management. This function can be used to group customers by department for example.
- Confirm the action to be performed by selecting the To Block or To Unblock column.
By default, maestro* suggests the action to be performed based on the validation criteria.
You can deselect all or select all by right clicking in the grid and selecting the appropriate option.
- Click Apply (F12).
The customer statuses are changed according to the selected action. If the To Block action is selected, maestro* changes the status of the customer based on the value selected in the Blocking Status field in Customer Management and Configuration.
See also
