Preparing T4 and RL-1 Slips
for the Year 2020
for the Year 2020
This maestro*EXPRESS describes the various steps required when preparing T4 and RL-1 slips. As you have been used to the past, you may print the current year’s government slips directly from maestro*. These slips are updated and approved on a yearly basis to ensure they include the latest changes made by the government authorities.
All modifications related to the 2020 taxation year that must be applied to the production of T4 and RL-1 slips program are included in the following updates. They will be available for download from maestro*CAFÉ on the date indicated below.
|
These updates MUST be installed to prepare valid slips. They are only available to customers who have renewed their annual Maintenance and Support contract. |
|
Maestro* Versions |
Update |
Release Date |
|---|---|---|
|
3.05 |
Update |
January 14, 2021 |
|
3.04 |
Update |
January 14, 2021 |
|
3.03 |
None |
Not available |
|
Reminders Sending Slips Electronically Employers preparing more than 50 information statement for a year Employers preparing more than 50 information statement (slips) for a calendar year must file their documents over the Internet. Furthermore, if the EDI Transfer option which enables electronic transmission is not visible in the Print T4 and RL-1 option, please contact the Sales department by phone at 450-652-6200, extension 266, or send an email to: sales@maestro.ca. You can also speak directly with your account manager. To access the option, it may be necessary to modify some security settings. Last, if you are sending your RL-1 slips electronically for the first time, you must register with the government beforehand. Refer to Appendix C at the end of this document for information on transmitting slips using the Internet. Employers preparing 50 RL-1 slips or less for a year Employers filing fewer than 51 RL-1 slips of the same type for a calendar year can also file their documents over the Internet or use Revenu Québec’s Online Services. |
|
|
While completing this document, we invite you to consult the Frequently Asked Questions - Preparing T4 and RL-1 Slips (FAQ), which regroups the questions frequently asked by Maestro customers concerning the production of these slips. Click HERE to view the FAQ. |
Should you have any question or require further information regarding this maestro*EXPRESS, please contact Software Support through the maestro*GUIDE portal or by phone at 1-877-833-1897.
summary
New Features and Updates
At the Federal Level
For the 2020 tax year, the Canada Revenu Agency (CRA) requires that new amounts be declared on the T4 slip, Statement of Remuneration Paid.
These requirements apply to every employer and will facilitate the validation of payments under the Canada Emergency Wage Subsidy (CEWS), The Canada Emergency Response Benefit (CERB), and the Canada Emergency Student Benefit (CESB).
For the 2020 tax year, in addition to reporting the employment income in box 14, or by using code 71, employers are also required to use the new codes to report an employment income and retroactive pay for the following periods:
- Code 57: Employment income – March 15 to May 9
- Code 58: Employment income – May 10 to July 4
- Code 59: Employment income – July 5 to August 29
- Code 60: Employment income – August 30 to September 26
The eligibility criteria for the CERB, CEWS, and CESB is based on employment income for a defined period. Employers must therefore report income and retroactive payments made during these periods.
|
|
Please note that these new codes will be integrated in maestro* and available following the download of the update planned for January 14, 2021. It will not be necessary to do a box redefinition to add those codes; they will be readily available on the employee slip generated by the software. |
Modifications to Car Benefits and Allowances (source):
- For 2020, the reasonable per-kilometre rates given as allowance for business kilometres driven in a year have changed:
- $0.59 per kilometre for the first 5,000 kilometres driven;
- $0.53 per kilometre driven after that.
- You must add an additional $0.04 per km traveled if you are in the Northwest Territories, Yukon, and Nunavut.
When calculating the operating expense benefit for an automobile provided by an employer, the rate is $0.28 for every kilometre driven for a personal use.
Modifications to Meal Allowances (source):
The CRA has increased the reasonable tax exoneration amount an employer can give as a meal allowance. This new amount went from $17 to $23$.
This reasonable allowance applies to the following circumstances:
- When an employee works overtime, if this does not happen often and is occasional in nature.
- When an employee is on the road, if they must work somewhere other than their workplace, to the employer's benefit.
At the Provincial Level (for Quebec only)
1. New Health Service Fund Contribution Rates
If you are an employer, other than a public sector employer, and if your total payroll for 2020 is less than $6 million, you could benefit from a reduction to your Health Service Fund (HSF) contribution rate. You must use your activity sector contribution rate to calculate your contribution to the HSF for the year.
You will find the HSF contribution rates for 2020 below:
|
|
Health services fund contribution rates (%) for 2020 (source) |
|
|---|---|---|
|
Total Payroll (TP) |
Primary and Manufacturing sectors |
Service and Construction sectors |
|
$1,000,000 or less |
1 |
1 |
|
$1,000,001 to $5,999,999 |
0.648 + (0.602 x TP/1,000,000)1 |
1.1280 + (0.5220 x TP/1,000,000)1 |
|
$6,000,000 or more |
4 |
4 |
1.The contribution rate must be rounded-off to the second decimal point. If the third decimal is greater than, or equal to 5, the second decimal is rounded-up to the superior whole number.
In maestro*
New detailed list for the validation of incomes by period
Available from the moment the Janurary 4, 2021 update is downloaded, a new list will make available the validation of incomes by period. Indeed, the form named Validation of Employment Incomes by Period – Detailed List will be added to the four lists available by clicking on the Excel export icon of the Print T4 and RL-1 Slips option. This form will facilitate the validation of incomes of four predetermined periods, displayed in boxes 57 to 60 of the T4 slip, as required by the Canada Revenu Agency (CRA) for 2020.
For more information, please read item 4 of the Frequently Asked Questions (FAQ) - Preparing T4 and RL-1 Slips.
Possibility to modify the Normes du travail's maximum salary before the slips' final production
Contrary to previous years, it is now possible, in maestro*'s government tables, to modify the Normes du travail's (CNESST) maximum salary before the production of T4 and RL-1 slips is done. Indeed, the Remuneration subject to the contribution amount (displayed on the Employer's Summary) is no longer calculated by taking into account this maximum salary.
|
|
The maximum salary used is displaued in the Configuration window of the Print T4 and RL-1 Slips option, in the Labour Standards section. For more information, refer to the Online Help (F1) Print T4 and RL-1 Slips. |
|
Test of the T4 and RL-1 We highly recommend using the Once the trial period is over, it is important to repeat the data generation in the Print T4 and RL-1 option; a slip number will be assigned to each employee at that time. |
Steps Related to Preparing T4 and RL-1 Slips
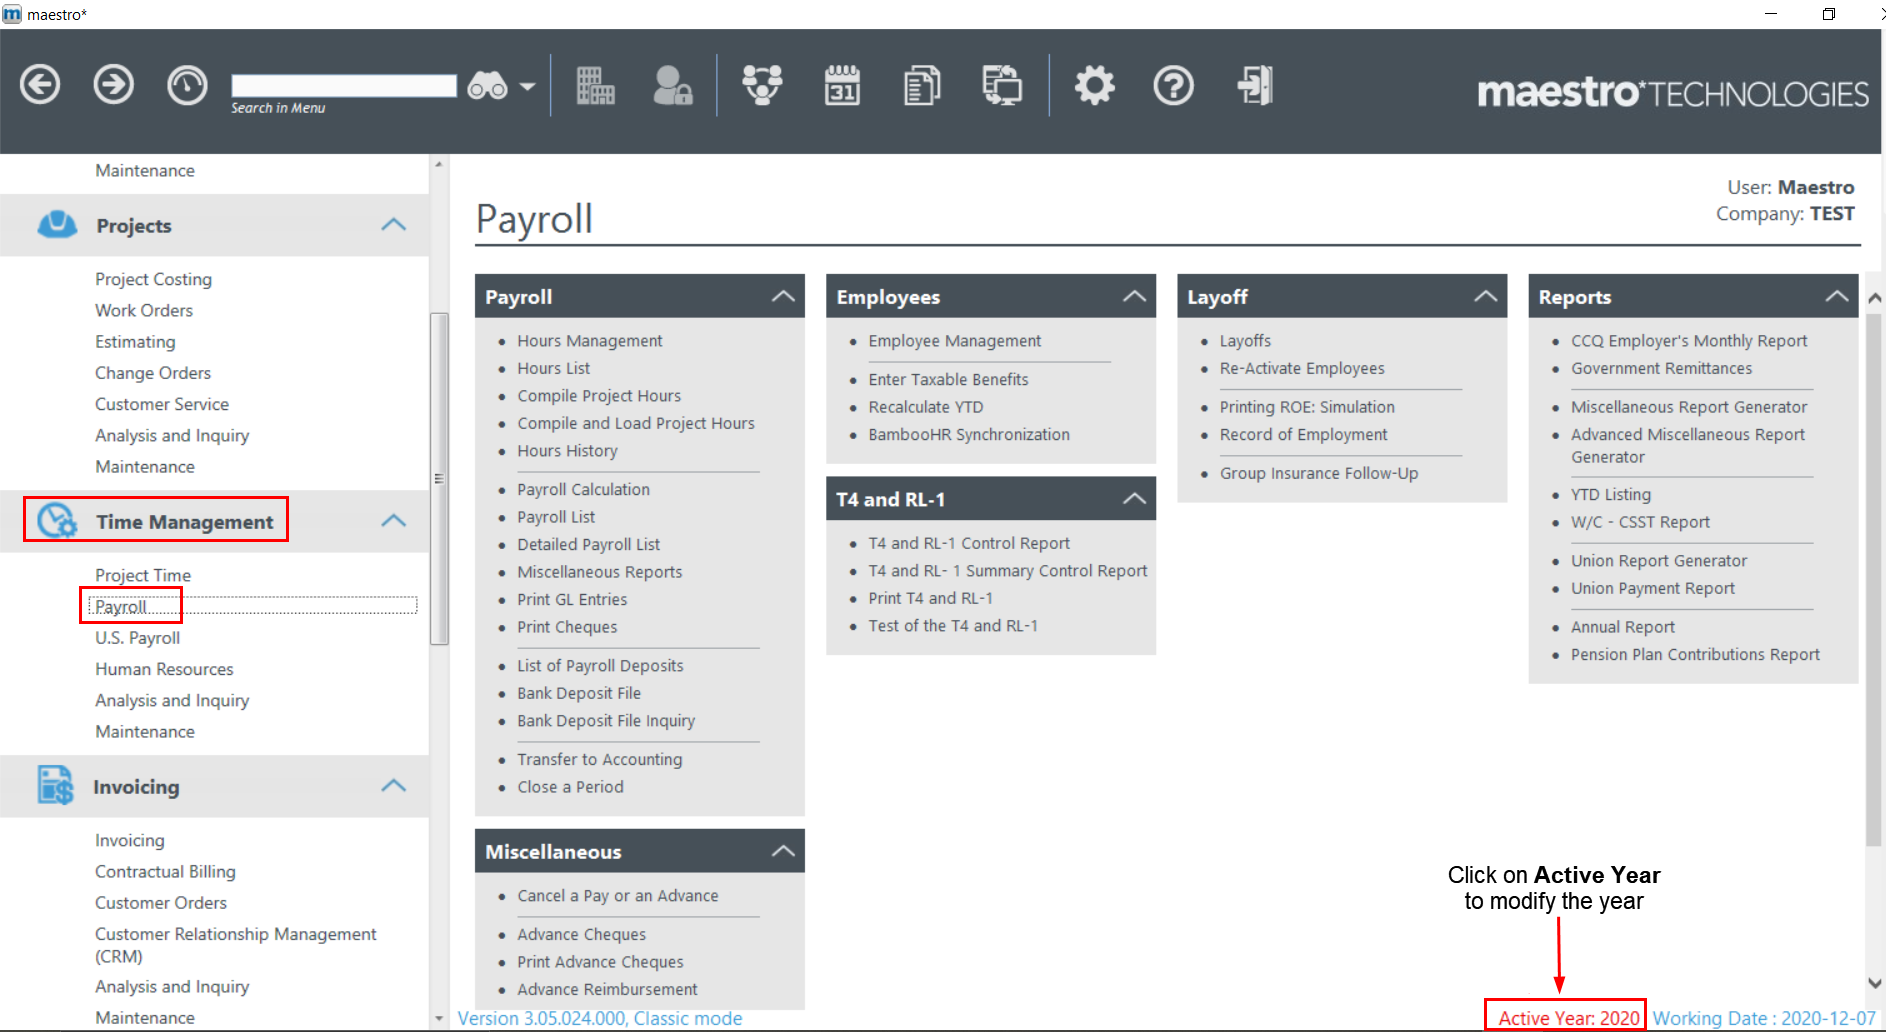
Taxation Year Verification
First, it is important to ensure all the steps are done in the appropriate calendar year by selecting 2020 as the active year. To do so:
- From the main Payroll menu, click on Active Year: 20XX located on the right side of the ribbon at the bottom of the window.
- Select 2020 and click on Ok.
Contact Verification
|
maestro* > Time Management > Maintenance > Payroll > Configuration |
To send the T4 and RL-1 slips electronically, it is suggested to complete the required information in the early stages of the process.
- From the menu on the left of the Configuration window, click T4 & T4A.
- Fill out the Transmitter and Contact sections located on the right side of the window.
Completing the Transmitter and Contact sections is essential; it provides the Canada Revenue Agency (CRA) with the proper information if they need to contact you should there be a problem with the transmitted files. The Contact’s section Email field is required to send T4 and T4A slips electronically.
- Afterwards, click RL-1 from the menu on the left of the Configuration window.
This option is available exclusively for the Canadian payroll; it is only visible if the EDI Transfer for government documents option is installed.
Multidimensional mode users can set different values for all the fields described below by indicating to which company the value applies. Click in the appropriate field, then on the Multidimensional values icon (located to the right of the field). In the Company Values window, enter the appropriate information for every listed company.
Make sure the main field remains empty if company prefixes are used in the configurations.
This section must be completed before generating the RL-1 XML file if modifications must be made to the numbering of the XML or paper slips.
- Fill out the Transmitter, Software, and Accounting sections located on the right side of the window.
The slip numbers for XML must be different from the sequence numbers used for printed slips.
The series of sequential numbers can be reused each year, so long as there are enough numbers for the quantity of RL-1 slips that must be filed to the Quebec government. Start with the first number in the series every fiscal year.
Multidimensional mode users can enter a different XML RL-1 slip number for each company prefix by clicking on the Multidimensional values icon. This icon becomes visible after clicking in the appropriate field on the Configuration window (when the RL-1 option is selected).
Entering the XML RL-1 slip number is required before generating the data.
To change the starting number:
- Enter the XML RL-1 slip number in the RL-slip number for XML field.
- If generating the data has already been made:
- Access the Print T4 and RL-1 option: maestro* > Time Management > Payroll > T4 and RL-1 > Print T4 and RL-1.
- Click the Configuration icon and select Configuration from the drop-down list.
- Click the Reset the seq. no. RL-1 button, then click Yes.
Maestro* will take the changes into account when sequencing.
Data Verification
Generate Data
Proceed with generating the data to compare the payroll information with the data that will appear on the tax slips.
|
maestro* > Time Management > Payroll > T4 and RL-1 > Print T4 and RL-1 |
|
When maestro* first generates the data for the current year, it checks if any boxes have been redefined for the current year. Provided that no redefinition was made, maestro* copies the global box redefinitions (which apply to all employees) from the previous year to the current one. |
- On the Print T4 and RL-1 window, click the Generate Data function.
- On the Parameter Selection window, select the appropriate province.
- Indicate if files must be generated for the federal tax by checking the relevant box and set the Sending Type to O – Original.
- Indicate if files must be generated for the provincial tax by checking the relevant box and set the Sending Type to 1 – Original.
- Select the employee(s) for which you want to obtain data.
- Click the Accept icon to generate the files, then exit the window.
Pivotal Analysis of Generated Values (optional step)
The pivotal analysis enables users to display amounts according to the box and employee. The province of employment and the form (slip) must be selected to display the generated values.
|
maestro* > Time Management > Payroll > T4 and RL-1 > Print T4 and RL-1 |
|
The Pivotal Analysis of Generated Values displays the information from all boxes, including additional boxes. As indicated in step 5 below, standard templates are available; they are identified by an asterisk (*) in the Pivotal Analysis of Generated Values window. |
- In the Print T4 and RL-1 window, click the Pivotal Analysis of Generated Values function.
- In the Parameter Selection window, select the appropriate Province in the field of the same name.
- Check the box(es) of the relevant form(s).
- Click the Accept icon to display the Pivotal Analysis of Generated Values window and its content.
- If needed, select a Template from the drop-down list.

- If applicable, transfer the report into an Excel file by clicking the Transfer to Excel icon.
- Click the Quit icon to exit the window.
Government Remittances Verification for 2020
|
maestro* > Time Management > Payroll > Reports > Government Remittances |
To check the government remittances amounts, the Government Remittances for the year 2020 report must be compared with the T4 and RL-1 Summary Control Report or the T4 and RL-1 Control Report. In case of discrepancies or to view detailed information per employee, it is preferable to use the T4 and RL-1 Control Report.
It is mandatory to filter the date by Payroll Date and not by Cheque Date.
T4 and RL-1 Summary Control Report
This report is used to compare payroll data with the data that will appear on the T4, T4A, and RL-1 slips as it combines information stemming from payroll (e.g. the opening cumulative as well as cumulatives and payroll data modifications). It also includes box redefinitions.
|
maestro* > Time Management > Payroll > T4 and RL-1 > T4 and RL-1 Summary Control Report |
- On the T4 and RL-1 Summary Control Report window, enter the corresponding Taxation Year.
- Check the Print detail box if needed.
- Select the appropriate province in the grid of the Province section.
- Select one or all employee(s).
- Select the relevant slip(s).
- Click the Accept icon.
- Click the Quit icon once you have finished looking at the data.
In the T4 and RL-1 Summary Control Report:
*Indicates that the maximum has been reached for this box.
**Indicates that the employee is exempted.
***Indicates that the amount is equal to the employment income entered in box 14.
An asterisk preceding the employee number means that the data has not yet been generated.
The T4 and RL-1 Summary Control Report must be run per province. By checking the Print detail field, it is possible to compare the displayed values with the opening cumulative, and the cumulative and calculated payroll with the amounts appearing on the various slips.
T4 and RL-1 Control Report
The T4 and RL-1 Control Report assembles information stemming from payroll (e.g. the opening cumulative as well as cumulatives and payroll data modifications). This data can then be compared with information on the T4, T4A, and RL-1 slips, including box redefinitions.
|
maestro* > Time Management > Payroll > T4 and RL-1 > T4 and RL- 1 Control Report |
- On the T4 and RL-1 Control Report window, enter the corresponding Taxation Year.
- If needed, check the Deduction Details box to see bonuses, unions, and retirement plans details.
- Check the Differences Only box to only show employees for which there are discrepancies between the payroll information and the data included in the slip(s).
- Select the appropriate province in the grid of the Province section (this report is province-specific).
- Select one or many employee(s).
- Select the relevant slip(s).
- Click the Accept icon.
- Click the Quit icon once you have finished looking at the data.
If asterisks appear next to an amount in the T4 and RL-1 Control Report, they mean of the following:
* Indicates that the maximum has been reached for this box.
**Indicates that the employee is exempted.
***Indicates that the amount in box 56 is equal to the employment income entered in box 14 and no amount will be displayed.
The T4 and RL-1 Summary Control Report and T4 and RL-1 Control Report can also be accessed through the Print T4 and RL-1 option by clicking the Print icon.
Report 412 (Pension Adjustment Calculation) as well as the new pension plan contributions report
To validate the pension adjustment calculated by maestro*, use report 412 Pension Adjustment Calculation; it will provide you with the information that will appear on the T4 and RL-1 slips.
|
maestro* > Time Management > Payroll > Payroll > Miscellaneous Reports |
|
Maestro* uses the following formula to calculate the pension adjustment: Employee Social Benefits + (Employer Social Benefits - [Social Benefits Tax / Tax Rate]) |
Since the 412 report displays CCQ employees' amounts only, it cannot be used to validate the amount in box 52 if the employee also works in a non-CCQ profession and contributes to a pension plan. It is better, in this case, to use the Pension Plan Contribution Report. It allows the validation of the pension adjustment (box 52) as well as the amount contributed to an RPP (box 20 for T4s and D for RL-1s).
|
maestro* > Time Management > Payroll > Reports > Pension Plan Contributions Report |
|
|
Other Data to Verify
Among the data requiring more particular attention:
- Provincial gross earnings;
- Federal gross earnings.
The resulting numbers are the sum of various data, namely the gross earnings, vacation time, taxable benefits, taxable portion of social benefits, and bonuses.
|
To verify earnings information, generate report 421 Provincial Gross Earnings Evaluation for the provincial gross earnings and report 422 Federal Gross Earning Evaluation for the federal gross earnings. Both can be accessed through the Miscellaneous Reports option in the Payroll module: maestro* > Time Management > Payroll > Payroll > Miscellaneous Reports. Additional sources of information are the guides produced by the various tax authorities, specifically regarding the definition of each box on the T4 and RL-1 slips. For provincial tax (Quebec only), go to http://www.revenu.gouv.qc.ca and search for “RL1-G”. For federal tax, visit http://www.cra-arc.gc.ca/, select your preferred language and search “RC4120”. |
All the information should be the same in every report. If there are discrepancies, validate the configurations that were made earlier.
Here are some examples of boxes to verify on the T4 and RL-1 slips:
 T4 Slip – 2020
RL-1 Slip – 2020
Data Modification
The data verification step may have unearthed some discrepancies. A few of them might stem from bonuses entered during the year that should not have been taxable – or, inversely, should have. These errors will be corrected by modifying the cumulative in the employee’s file. Once that data has been rectified, it will match the content of the T4 slip. Every box linked to this change will have to be adjusted.
|
It is always better to redefine boxes than directly modify cumulatives in an employee's file. For more information, see the How To document Redefine Boxes. |
|
If any corrections are made, repeat the Generate Data step before reprinting T4 and RL-1 slips. |
Redefine Boxes
Employee slips can be quickly modified without having to change each cumulative individually. In fact, users can modify the formula used to calculate the amounts appearing in every slip boxes for all employees, a selected few or a specific one. This method proves to be very useful in cases where a bonus should have been entered as taxable but wasn’t.
|
Reminder – This operation does not modify the cumulative data in employee files. |
Some slip boxes don’t have default formulas. To enter an amount, the formula has to be configured by the user. If, for whatever reason, a user wishes to change the default calculation formula, use the Redefine Boxes function from the Print T4 and RL-1 option.
|
|
For more information on the necessary box redefinitions for the production of T4 and RL-1 slips of Native American employees, read the How To - Preparing T4 and RL-1 Slips for a Native American Employee. |
To See the Previous Year’s Box Redefinitions
|
maestro* > Time Management > Payroll > T4 and RL-1 > Print T4 and RL-1 |
- On the Print T4 and RL-1 window, click Redefine Boxes in the Processing section.
- On the Redefine Boxes window, click the Definitions of the Previous Year tab. It shows all box redefinitions for the year preceding the current taxation year. The information that is displayed depends on the settings defined in the Filters / Default Values section.
- Click the Filter Data According to Specified Parameters icon.
To Copy a Formula Used the Previous Year
- After looking at the previous year’s box redefinitions,, while still on the Redefine Boxes window in the Definitions of the Previous Year tab, select the formulas you wish to copy in the Selection column.
- Click the Copy the Selected Items to the Current Year icon.
- Click Yes on the confirmation window.
- Enter and complete the required information on the Details tab.
- Click Save, then Quit.
To copy all the previous year’s formulas, right-click in the grid of the Definitions of the Previous Year tab and click the Select All option. Repeat steps 2 to 5 described above.
Amounts contributed to a voluntary retirement savings plan (VRSP) should not affect T4 and RL-1 slips. If they do, a box redefinition will be required to correct the situation as these amounts should not impact the wages or pension adjustment (employee portion). For additional information on setting up a VRSP, see How-To – Creating a Voluntary Retirement Savings Plan (VRSP) in maestro*.
Examples of error and validation messages are listed in Appendix A.
Modifying Taxable Benefits
The Enter Taxable Benefit option allows users to enter a taxable benefits transaction not calculated by payroll on a regular basis for an employee; as an example, it could be a car allowance calculated on a yearly basis. The transactions added through this option are found in the employee cumulatives and used in Preparing T4 and RL-1 Slips.
|
maestro* > Time Management > Payroll > Employees > Enter Taxable Benefits |
Adjusting Taxable Benefits
- In the Enter Taxable Benefits window, select the Employee, Beginning Pay Period, and Province in the corresponding fields.
- Enter the required amounts in the Taxable Benefits section in accordance with the appropriate government level.
- Click the Save (F12) icon.
- Click the Quit icon.
Modifying Cumulatives in Employee Files
|
maestro* > Time Management > Payroll > Employees > Employee Management |
- In the Employee Management window, select the employee number for whom there are modifications to make.
- Click the Edit Employee Cumulatives icon.
- In the Edit Cumulatives window that opens, place the cursor in the field to correct in the Modification column.
- Insert the positive or negative adjustment amount, following the case.
- Click the Save (F12) icon.
- Click the Quit icon.
Once the cumulatives are adjusted, the Miscellaneous Reports and Print T4 and RL-1 options will take this into consideration.
Printing T4, T4A and RL-1 Slips
Once the data has been verified, the Print T4, T4A and RL-1 option allows the user to print the documents necessary for the taxes.
|
maestro* > Time Management > Payroll > T4 and RL-1 > Print T4 and RL-1 |
- In the Production of the T4 and RL-1 window, click the T4, T4A and RL-1 option in the Print section, located to the left side of the window.
- Select the desired Province in the dropdown menu.
- Determine which document to print (T4, T4A or RL-1) and how you want the employees to appear.
- Click the Accept icon.
- Click the Print icon, then the Quit icon.
To print T4A for subcontractors, it is mandatory to complete the information in the Income Taxes tab of the Employee Management option, by indicating the number and name of the company. If a supplier number is specified in the Employee ID tab, the company’s name will be automatically displayed.
Generate T4/XML File
Use this option to create the XML file for the T4s.
|
maestro* > Time Management > Payroll > T4 and RL-1 > Print T4 and RL-1 |
- Click the Generate T4/XML File appearing on the left menu of the Print T4 and RL-1 window, in the EDI Transfer section.
- Select the province for which you want to create an XML file by clicking on the province line.
A file has to be produced for each of the provinces.
- Click the Accept icon.
- Check or modify, if necessary, the destination path by clicking the right button of the Output field.
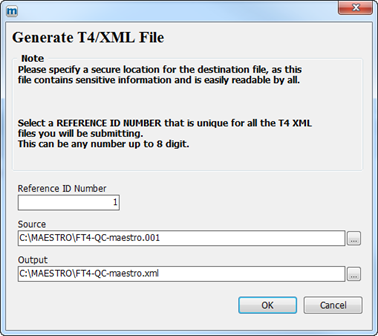
It is important to remember the destination path of these files since they will eventually have to be sent to governments.
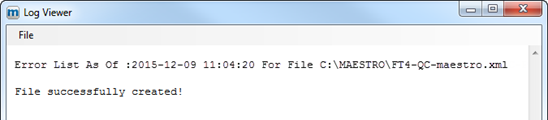
- Click OK to view the number of T4s produced in the new window displayed.
A Log Viewer window will appear to display potential errors. If there are any, correct the data and repeat the steps to Generate data in the Processing section of the Print T4 and RL-1 window before repeating the step Generate T4/XML File.
- In the Log Viewer window, click the Cancel button to quit the option.
Generate T4A/XML File
Use this option to create the XML file for the T4As.
|
maestro* > Time Management > Payroll > T4 and RL-1 > Print T4 and RL-1 |
- Click the Generate T4A/XML File appearing on the left menu of the Print T4 and RL-1 window, in the EDI Transfer section.
- Select the province for which you want to create an XML file by clicking on the province line.
A file has to be produced for each of the provinces.
- Click the Accept icon.
- Check or modify, if necessary, the destination path by clicking the right button of the Output field.
It is important to remember the destination path of these files since they will eventually have to be sent to governments.
- Click OK to view the number of T4As produced in the new window displayed.
A Log Viewer window will appear to display potential errors. If there are any, correct the data and repeat the steps to Generate data in the Processing section of the Print T4 and RL-1 window before repeating the step Generate T4A/XML File. - In the Log Viewer window, click the Cancel button to quit the option.
Generate RL-1/XML File
This option must be used to create the XML files for RL-1 slips.
|
maestro* > Time Management > Payroll > T4 and RL-1 > Print T4 and RL-1 |
- Click the Generate T4A/XML File appearing on the left menu of the Print T4 and RL-1 window, in the EDI Transfer section.
- Select the province for which you want to create an XML file by clicking on the province line.
A file has to be produced for each province.
- Click the Accept icon.
- If necessary, check or modify the destination path by clicking the right button of the Output field.
It is important to remember the destination path of these files since they will eventually have to be sent to governments.
- Click OK to view the number of RL-1s produced in the new window displayed.
A Log Viewer window will appear to display potential errors. If there are any, correct the data and repeat the steps to Generate data in the Processing section of the Print T4 and RL-1 window before repeating the step Generate T4A/XML File. - In the Log Viewer window, click the Cancel button to quit the option.
Validating XML Files
This option enables the validation of different XML files before sending them electronically. This step is only necessary if the user edited manually an XML file. To do this:
|
maestro* > Time Management > Payroll > T4 and RL-1 > Print T4 and RL-1 |
- Click the XML Validator appearing in the EDI Transfer section of the Print T4 and RL-1 window.
- Select the form to be validated and then, click OK.

- Select the province.
- Click on the Accept icon.
- Maestro* asks you to confirm the location of the XML Source File. Modify the path if necessary; click OK if the path is correct.
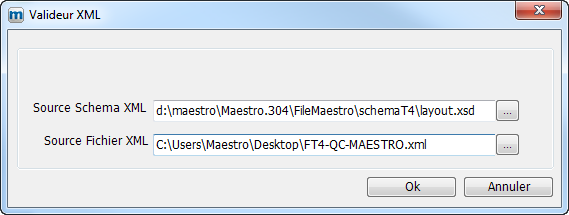
|
A message confirming the validity of the file is displayed on the screen. If an error message appears, correct the situation and repeat the steps starting from Generate data. This is to be done after correcting the problems. |
|
After validating the XML files, users must send them to the federal and provincial governments; maestro* does not do it automatically. To do so, use the following links:
Additionally, the Employer’s Summary report, available in the Print T4 and RL-1 option in maestro*, under the Processing section, provides all the information required to complete the RLZ-1.S form (Summary of Source Deductions and Employer Contributions). However, companies are responsible of filling out and sending the form the Quebec government. No equivalent report is required by the Canadian government. |
APPENDIX A
Common Errors
Message 1
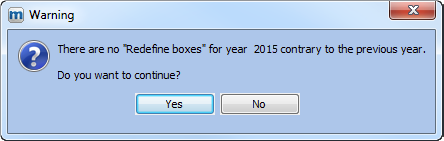
This message is displayed if there are box redefinitions for specific employees, for the previous year, and if maestro* does not find them in the box redefinitions for the current year.
If the user clicks YES, the data will be generated. If not, processing will be interrupted.
Potential Solutions:
- Check whether the box redefinitions for the previous year, related to employees, still applies to the current year. If yes, copy the box redefinitions for the current year.
- Repeat the Generate Data step.
Message 2
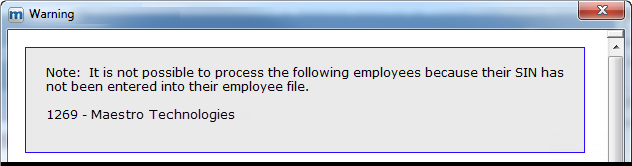
This message is displayed if no SIN has been entered for an employee. Data will not be generated for this employee.
Potential Solutions:
- Access Employee Management (maestro* > Time Management > Payroll > Employees > Employee Management) and enter the SIN.
- Repeat the Generate Data step to correct the information.
Message 3
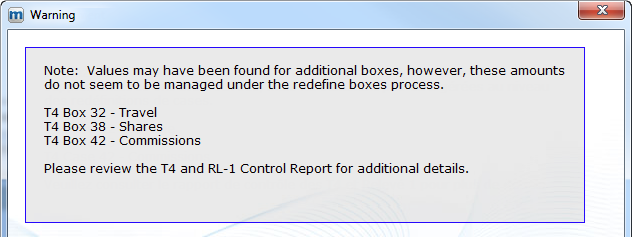
This message is displayed when maestro* finds amounts, in payroll, likely to affect the additional boxes but there are no box redefinition for them.
Potential Solutions:
- Print the T4 and RL-1 Control Report.
- From the T4 and RL-1 Control Report, check the amounts in the additional boxes and define these additional boxes in Redefine Boxes in the Test of the T4 and RL-1 option.
- Repeat the Generate Data step to correct the information.
APPENDIX B
Modifying T4, T4A, and RL-1 Slips After the Initial Transmission
This appendix lists the steps required to modify T4, T4A, and RL-1 slips after they have been sent to the government authorities.
Verify the Taxation Year
Start by verifying the active year to make sure the appropriate calendar year is selected in maestro*. To do so:
- From the main maestro* menu, click on Active Year: 20XX located on the right side of the ribbon at the bottom of the window.
- Select 2020 and click Ok.
Redefine Boxes
See the help topic Print T4 and RL-1Print T4 and RL-1 for the steps required to redefining boxes.
Generate Data
|
maestro* > Time Management > Payroll > T4 and RL-1 > Print T4 and RL-1 |
- Click the Generate Data function on the Print T4 and RL-1 window.
- On the right side of the Parameter Selection window, select the appropriate province.
- Indicate which files must be generated for the federal/provincial tax(es) by checking the relevant box(es).
- Select the Sending Type, which should be M – Amendments for the federa tax and/or 4 – Amended for the provincial tax.
- ONLY select the employee(s) for which you want to obtain data.
- Click the Accept icon to generate the files, then exit the window.
Printing T4, T4A, and RL-1 Slips
|
maestro* > Time Management > Payroll > T4 and RL-1 > Print T4 and RL-1 |
- In the Print T4 and RL1 window, click the T4, T4A and RL-1 function under the Print section.
- If needed, select the appropriate Province.
- Select the documents that need to be printed (T4, RL-1, or T4A) and how the employees should be displayed.
- Click Accept.
- Click the Print icon, the Quit icon.
The slips will be printed for every selected employee.
|
Click OUI/YES if the following message appears after printing the amended RL-1: “Do you want to update the sequential numbers?”. |
|
Do not forget to put 2021 for the active year if it has been changed at the beginning of the modification process. |
APPENDIX C
Transmitting Slips Using the Internet
If you are planning on sending your RL-1 slips electronically, and you are doing it for the first time, you must first activate the function with the government through the Revenu Québec online services website.
To send slips using the Internet, you must be registered as transmitter, i.e. “any person or business that uses certified software to file RL slips either manually or electronically and that distributes them”. To do so:
- Complete the ED-430 Transmitter Registration Form; this PDF document is available on the Revenu Québec website.
- After completing it online, click the Send button located at the bottom of the second page to immediately send it by email. A few days later, you will receive a registration confirmation containing your transmitter number (including the series of sequential numbers you will have to use when preparing the slips).
- When you have finished preparing the RL-1 slips, go to the Transmitting RL Slips Online page, which can be accessed from the Filing RL Slips option in the Income Tax section of the Online Services.
- Click the Access Service blue button to display a new popup window.
Make sure your Web browser allows popup windows.
- On the Transmitting RL Slips window, click the Start button.
- Enter your Transmitter Number and your Identification Number (a 10-digit number assigned to your business for various purposes, for example, when it registered for source deductions; it is shown at the top of the letter whose subject line reads Confirmation of your transmitter number and series of numbers).
- Then, click the Next button.
The next steps are described in great detail on each page; you only have to follow the instructions. Should you experience difficulties with the Transmitting RL Slips service, contact Revenu Québec’s technical assistance directly by phone at 1 866 814-8392.