uninstalling and reinstalling maestro*
objective
Uninstalling and reinstalling maestro* may be required on certain occasions, for instance, when unrecoverable errors are caused by an operating system update.
|
The uninstalling and reinstalling must only be executed as a last resort, when no other procedure can fix the problem. If you are not comfortable with this procedure, please contact Software Support through the maestro*GUIDE portal or by phone at 1-877-833-1897. |
prerequisite
- Have Windows Adminstrator rights
- IMPORTANT: Microsoft Outlook must be closed
summary
steps
Deleting maestro* librairies
- Open the C:\Program Files (x86)\Maestro Technologies\Maestro\System\ directory.
- Right-click on the AnalyseReg.exe file and select Run as Administrator.
- On the Outils Maestro (Maestro Tools) window, select Maestro RegClean.
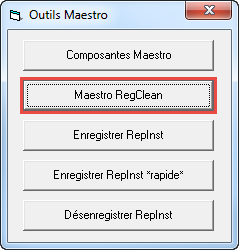
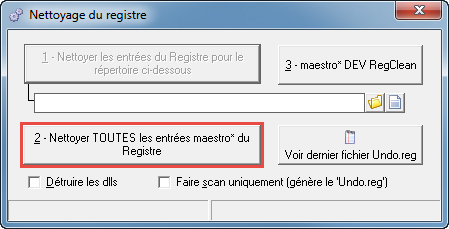
- On the Nettoyage du registre (Registry Cleaning) window, click on Nettoyer TOUTES les entrées maestro* du Registre (Clean ALL maestro* entries from the registry).
- Close the Nettoyage de registre window. Back on the Outils Maestro window, select Composantes Maestro (Maestro Components) to make sure no components are left.

- If there are no entries, close the Outils Maestro window of AnalyseReg.
Uninstalling maestro*
Using Windows’ Programs and Features tool, uninstall the following applications as you would any other:
- Maestro*
- Amyuni or Maestro Amyuni
- maestro Outlook Addin
- Maestro Third Parties
- Redemption xXX vX.XX (the X represents the installed version).
Deleting maestro*’s installation directory
- Search for the file Chrome.ini in the following folder depending on your Windows:
- Windows 32 bit: C:\Program Files\Maestro Technologies\Maestro\System;
- Windows 64 bit: C:\Program Files (x86)\Maestro Technologies\Maestro\System;
- If there is a file named Chrome.ini, copy the file Chrome.ini on your Desktop. If not, ignore this step.
- Delete the folder Maestro Technologies and all its content.
Reinstalling maestro*
- Open a Windows Explorer;
- Select drive M:;
If URI mode without a mapped drive is used, access the shared folder with the following method: \\ServerName\MaestroSharedFiles where ServerName is the name of your maestro* server.
- URI Mode: Navigate to the Client folder;
Classic Mode: Navigate to the Maestro\SharedFiles\Client folder; - Execute MaestroClient.exe;
Do not execute MaestroClient.MSI.
MaestroClient.EXE has a white asterisk in a blue square icon.
- Click on: Next, Next, Install, End;
- If at the directory deletion step you have backed up a copy of the file Chrome.ini, move the file in the following folder, depending on your Windows version:
- Windows 32 bit: C:\Program Files\Maestro Technologies\Maestro\System;
- Windows 64 bit: C:\Program Files (x86)\Maestro Technologies\Maestro\System.
As maestro* has already been installed, it will keep its configuration from before the re-install.