Switching from Classic mode to URI mode or vice-versa
Objective
The purpose of this document is to guide users in the procedure of switching from Uniform Resource Identifier (URI) mode to the Classic connection mode and vice-versa. Note that this procedure only applies to users of version 3.03 and higher of maestro*.
Prerequisites
- Having underhand the name of the maestro* server.
- In classic mode, a network drive permanently connected to the Maestro$ share.
- M:\ = \\ServerName\Maestro$
- In URI mode, a network drive permanently connected to the MaestroSharedFiles share. (Optional).
- N:\ = \\NomDuServeur\MaestroSharedFiles
|
For assistance with the network drives, contact your IT specialist. |
Summary
Brief description of the connection models for maestro*
Classic Mode
The classic mode is the connection method that is used by maestro* since its beginnings.
In order to connect maestro* to the database, the classic mode uses a network drive. In general, the drive M:\ is used.
This type of connection is less secure than the URI mode because users have access to the maestro* Data folder, giving them the possibility to inadvertently move or delete some files.
This type of connection is usually reserved to maestro* administrators. It is required for managing the companies and security.
|
The data server is always configured in Classic mode. |
URI Mode
The URI mode (Uniform Resource Identifier) was introduced with maestro* 3.03.
In order to connect maestro* to the database, the URI mode uses an ODBC connection which produces a direct database access.
This type of connection is used by all maestro* users who doesn’t need to manage companies or security.
In URI mode, a network drive is usually connected but is only used to access to the shared files, the documentation and the installation files.
|
The Terminal Servers are usually configured in URI mode. |
In order to switch from one mode to the other, the maestro* configuration wizard is used.
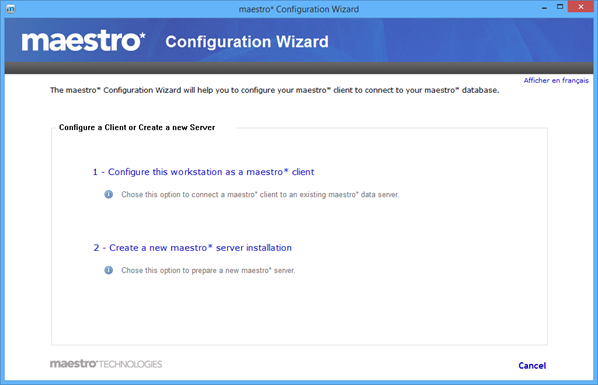
Maestro* Configuration Wizard
The maestro* configuration wizard is used to set the connection method.
|
Windows > Start Menu > All Programs > Maestro Technologies > Tools > Maestro* Configuration Wizard |
Click on 1 – Configure this workstation as a maestro* client.
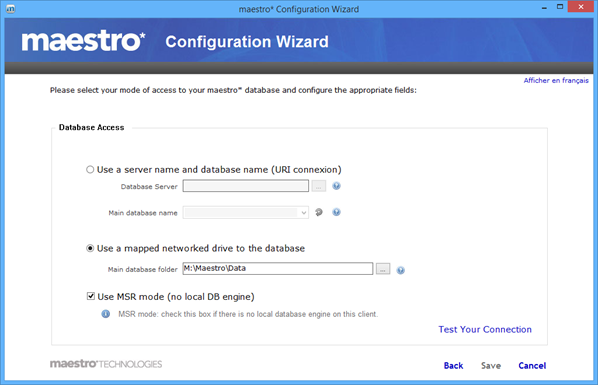
Classic Mode Configuration
- In classic mode, a network drive must be connected (see Prerequisites section);
- Select option Use a mapped networked drive to the database;
- In field Main database folder, type M:\Maestro\Data;
The M:\ drive is used by default but it is possible that your company uses another drive letter.
- Click on Test Your Connection;
- If confirmation is given that the connection was successful, click Save, then Finish.
If the connection is not successful, make sure that the correct network drive is selected and that it can be reached by Windows Explorer.
|
The MSR mode must always be selected. (Except on the Data server itself). |
URI Mode Configuration
- For the URI mode, The ODBC option must be activated on the server and the databases must be up to date (see Prerequisites section);
- Select option Use a server name and database name (URI connection);
- In field Database Server, you can either:
- Type the maestro* server name and press Enter or;
- Click on the browse button and select the maestro* server from the drop-down list;
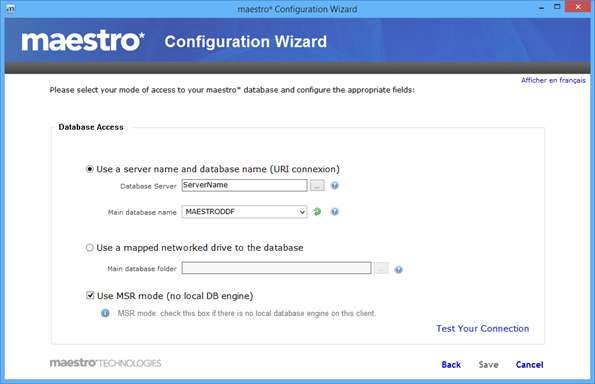
- Click on the green arrow to obtain the “Main database name”. The default Main database name is “MAESTRODDF”;
- Click on Test Your Connection;
- If confirmation is given that the connection was successful, click Save, then Finish;
If the connection is not successful, make sure you typed the correct server and database names. If the workstation was configured in classic mode, you can disconnect the M:\ drive and optionally connect the N:\ drive (see Prerequisites section).
|
The MSR mode must always be selected. (Except on the Data server itself). |