Managing CCQ Banked Hours
OBJECTIVE
The Commission de la construction du Québec (CCQ) allows employers to manage banked hours for the Light Residential and Heavy Residential sectors only. For more information on this topic, refer to the Banked Hours article on the CCQ website.
Maestro* allows the user to manually identify hours to be banked and those to be paid.
When hours are transferred, hours (including bonuses defined as revenue) classified by checking the Bank checkbox will be posted in the project specified in the transaction. The offset will be charged to the project, activity and group identified in Configuration - Time Management.
|
Fringe benefits posting is not accounted for in transactions involving banked hours. |
Banked hours are paid in the time entry by clicking the Banked hours management icon. When these transactions are transferred, an entry is generated to reverse the original transaction and a new entry is generated under the date the payment was completed on to finalize the transaction. Project costs are adjusted based on the payment of banked hours and takes into consideration any potential change that may be made when these hours and bonuses are paid.
PREREQUISITE
Summary
The process that governs banked hours is actually a logical series of events. Before hours can be banked, the following tasks must be completed:
- Enable the posting of banked hours
- Identify the annexes applicable to using banked hours (e.g. R and R1).
After the settings have been changed, another series of events follows:
- Include the number of banked hours on the employee's pay stub
- Identify the hours that will be banked
- Pay the banked hours
- Impact on the CCQ Employer’s Monthly Report
- Impact on the record of employment
Steps
Enabling the posting of banked hours
Two configurations are required to enable and post banked hours.
First Configuration: Time Management Configuration
Define a project, activity and group to be used when banked hours are posted.
|
maestro* > Time Management > Maintenance > Time Management > Configuration |
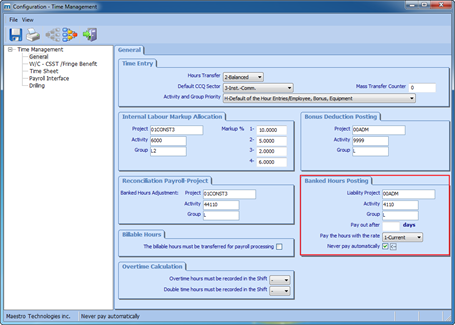
- In the General tab, fill in the fields in the Banked Hours Posting section. Refer to the table below.
Field
Select
Liability Project
The project to which banked hours are posted.
Activity
The activity to which banked hours are posted.
Group
The group to which banked hours are posted.
Pay out after
Leave this field empty. Otherwise, the banked hours will be paid automatically after X days.
Pay the hours with the rate
Current to pay hours at the rate in effect when they are paid.
Never pay Automatically
Check this field to manually manage the payment of banked hours to the employee.
- Click Save and then Quit.
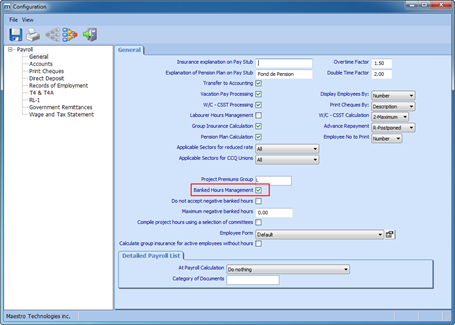
Second Configuration: Payroll Configuration
|
maestro* > Time Management > Maintenance > Payroll > Configuration |
- In the General tab, check the Banked Hours Management checkbox to enable the management of banked hours.
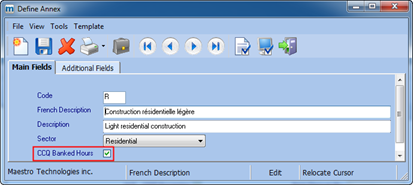
Identifying the annexes applicable to using banked hours
By identifying the annexes, the banked hours are included in the CCQ Employer’s Monthly Report.
|
The management of banked hours is only for the annexes R and R1. |
|
maestro* > Time Management > Maintenance > Payroll > Define Annex |
- In the dropdown menu of the Sector field, select the annex related to the Residential sector.
- In the Main Fields tab, check the CCQ Banked Hours checkbox (see below).
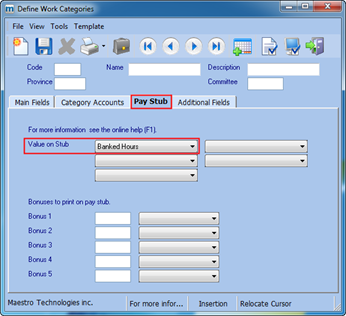
Adding the number of banked hours to the employee's pay stub
|
maestro* > Time Management > Maintenance > Payroll > Define Work Categories |
- Click the Pay Stub tab and then, in the Value on Stub field, select the Banked Hours value (see below).
Entering a new value (variable) removes the default values. All of the values to be printed must therefore be entered. The default values are: Worked Hours, vacation calculated, taxable benefit provincial, taxable benefit federal, pension plan and Advance pay.
Identifying the hours that will be banked
When entering hours for employees in the Light Residential and Heavy Residential sectors, the user must manually identify the hours or the income bonus type that will be banked.
|
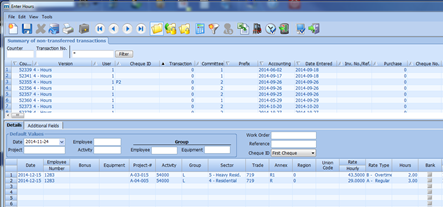
maestro* > Time Management > Project Time > Processing > Enter Hours |

- In the breakdown grid, enter the employee's hours, paying particular attention to the following fields:
Field
Select/Enter
Annex
Annex R or R1 based on the residential sector.
When the annex is specified, the sector is identified automatically.
Rate Type
Hours to be banked for the CCQ must be entered at the regular rate.
Hours
The number of hours to be banked.
Bank
Check this field to specify that the hours should be banked.
NOTE: If the Bank column is not displayed, click the right mouse button, select the Configuration option and check the Bank field. The field will not be available if Configuration has not been completed.
To complete the other fields, refer to the Hours help file.
- Click Save.
- Transfer the hours by clicking the Transfer icon in the Enter Hours window to transfer one transaction at a time, or click the Transfer Transactions icon in the icon bar of the main menu.
- The costs for labour will be posted to the projects and their offset will be posted in the indentified project for the accounting of the banked hours.
- The banked hours can also be found in by clicking on the Time management menu, then on the Payroll sub-menu.
- Look for the Employees section, then click on the Employee Management option. The Employee Management window will open.
- Select the Payroll Information tab. The information can be found in the Total Banked Hours field.
|
You can view the banked hours by clicking on the Time management menu, then on the Project Time sub-menu. In the Processing section, click on the List of Project Transactions option, or on the List of Hours option in the Reports secton. For the latter, select the appropriate Hour Type in the List of Hours window. |
Paying the banked hours
|
maestro* > Time Management > Project Time > Processing > Enter Hours |
- Click the Banked hours management icon (see below). A window with the list of banked hours will open (see below).


In the Banked hours management window, click on the Filter Data According to Specified Parameters icon to display an employee's transactions by specifying an employee ID.
- Change the table to suit your needs.
Field
Description
To Pay
When checked, tells maestro* that the banked hours are to be paid. This field is used to fill in the missing hours for a one-week pay.
To liquidate
Indicates to maestro* that the banked hours related to annexes R or R1 must be reset to zero. This field is used annually or at the end of the averaging period to empty the banked hours or when an employee leaves.
Subtracted Hours
Number of hours to be subtracted from the banked hours.
Hours to be paid
Number of hours that will be paid according to the ratio for the sector and the type of banked hours.
The number of hours to be paid can be modified manually and the number of hours subtracted will be updated automatically.
Rate to pay
Hourly rate used to pay hours.
Table explaining the calculation and the applicable type of rate to pay or liquidate three hours, depending on the sector.
Sector
To Pay
To Liquidate
Subtracted Hours
Hours to be paid
Rate to pay
Light Res.
X
3
3
A - Regular
Light Res.
X
3
3
B - Overtime
Heavy Res.
X
3
**2
B - Overtime
Heavy Res.
X
3
3
C - Double
In the Heavy Residential sector, if hours are paid to complete a work week (To Be Paid), maestro* performs the following calculation to comply with the requirements of the CCQ:
The subtracted hours are multiplied by 0.66 to obtain the number of paid hours. The result is rounded. For other types, the ratio is calculated 1 to 1. Therefore, one paid hour is one subtracted hour from the banked hours.
The displayed hourly rate depends on the information defined in the Pay the hours with the rate field in the Configuration option. Click on the Configuration icon in maestro* and choose the General Settings option. The General Settings window will open. Open the Time management menu on the left and click on the General sub-menu. The Pay the hours with the rate field is on the bottom-left of the window. It can either represent the hourly rate in effect if the field is set to 1 - Current, or the hourly rate in effect when the hours have been banked.
- Click the Validate the Table icon. If errors are found, make the necessary corrections The errors are written in the bottom-center of the window..
- Click Apply. The window will close and maestro* will copy the hours and bonuses to be paid in the time entry window.
- In the hours screen, a transaction is displayed (see below). This transaction must include the hours and bonuses selected in the previous window. Click Save.
When the transaction is transferred, which can be done immediately or during fringe benefits accounting, the original accounting entry will be reversed and replaced with a new entry that takes subsequent changes made during the payment of hours and bonuses into consideration.
Impact on the CCQ Employer’s Monthly report
The follow-up on banked hours (reserved or paid) must be included in the employee’s monthly CCQ report.
|
maestro* > Time Management > Payroll > Reports > CCQ Employer's Monthly Report |
- Select the settings for printing the report and then click Accept. The report is displayed on the screen (see below).
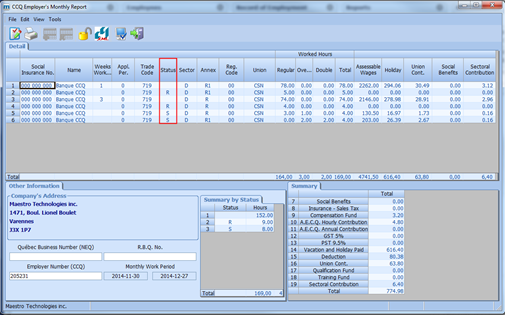
The Status column lets the user see the banked hours by the following codes:
Status
Meaning
R
Indicates that the hours have been banked.
NOTE: No CCQ contribution calculations are performed for these hours.
S
Indicates that the hours are paid from the banked hours.
Impact on the record of employment
During the layoff, the banked hours must be liquidated in the last work week to ensure that banked hours are displayed in the weeks during which they were worked.
See also
