Print T4 and RL-1
OBJECTIVE
The Print T4 and RL-1 option is used to print the government slips for the selected tax year. Forms printed in maestro* are approved by government on a yearly basis. They reflect the changes required by the various government agencies.
PREREQUISITES
- Configuration - Payroll – T4 & T4A and RL-1 tabs
- The latest maestro* update includes the latest government changes.
- Confirm the data entered.
Summary
The steps for printing the T4, T4A and RL- 1 slips are:
- Configuration
- Data Correction
- Redefine Boxes
- Data Generation
- Pivotal Analysis of Generated Values
- Employer’s Summary
- Print T4, T4A and RL-1 Slips
- EDI Transfer - Preparation of XML Files
- Appendix - Error Messages
Steps
|
maestro* > Time Management > Payroll > T4 and RL-1 > Print T4 and RL-1 |
|
To determine which reports should be confirmed before processing T4 and RL-1 slips, refer to the latest Preparing T4 and RL-1 maestro*EXPRESS. |
|
To print T4, T4A and RL-1 slips in XML format, you must complete the T4 & T4A and RL-1 tabs in configuration for payroll before generating the data. |
Configuration
Taxation Year
By default, the taxation year is displayed based on the year of the operating system on the computer minus 1. The taxation year is used to tell the system the year for which slips will be processed. To print T4 and RL-1 slips, you should ensure that the taxation year is the year to be processed.
To change the taxation year:
- Click the Select the Taxation Year icon.
- Enter the taxation year and click OK.
Configuration Icon
The Configuration section includes the Configuration and Payroll Configurations functions.
To specify the calculation source for the T4 and RL-1 slips
- Click the Configuration icon and complete the sections.
- Location of Working Files section:
Field
Description
Path
Let’s you choose the directory in which the generated files will be saved. Select the location by clicking Browse.
NOTE: By default, the specified directory is the desktop.
- Considered Payroll section:
Field
Description
Payroll Date Range
By default, displays the pay periods defined in the committees, taking all committees into consideration.
NOTE: These dates cannot be changed.
Cheque Date Range
Prints T4 and RL-1 slips according to the payment date.
According to the tax year
Prints T4 and RL-1 slips based on committee pay periods.
NOTE: To be used if your start and/or end periods differ from one committee to another.
- Maximums section:
This section displays the maximum amounts to be included on the T4 and RL-1 slips if the maximum amounts were reached for the taxation year, for information purposes.
These maximum amounts are provided by maestro* every year with the T4 and RL-1 program.
Field
Description
Employment Insurance
Maximum annual amount for employment insurance to be shown in box 24 on the T4, if the maximum is reached.
QPP
Maximum annual amount for the QPP to be shown in box 26 on the T4 and box G on the RL-1 if the maximum is reached.
QPIP
Maximum annual amount for the QPIP to be shown in box 56 on the T4 for Québec only, and in box I on the RL-1 if the maximum is reached.
Field
Description
Reset Seq. No Rel. 1
Resets the slip numbers recorded to the beginning of the series provided to your company.
NOTE: You only need to reset the slips if there are not enough numbers to print the T4 and RL-1 slips for all of your employees.
Field
Description
Max. Labour
Displays to maximum salary to use for the employer's summary.
NOTE: The maximum salary will be delivered with the PCINFO file (file from the FileMaestro\T4 directory, which contains all maximums) and will not be modifiable.
Rate
Displays the rate to use for the employer's summary.
NOTE: The rate will be delivered with the PCINFO file (from the FileMaestro\T4 directory, which contains all maximums) and will not be modifiable.
- Click OK to exit the Configuration screen.
To configure the information necessary to create files in XML format:
- Click the Payroll Configurations icon and complete the T4 & T4A and RL-1 sections.
For information on the fields to be completed, refer to the Configuration help topic.- Click OK to exit the Configuration screen.
Data Correction
It may sometimes be necessary to make corrections to the data printed on the T4 and RL-1 slips of employees after installing the payroll module in maestro* or if a bonus or deduction has been configured incorrectly.
There are two ways to correct data in the application:
|
Method 1: Changing an employee's cumulative amounts |
Method 2: Changing only the T4 and RL-1 slips |
|---|---|
|
Correct an employee's cumulative amounts to ensure that the T4 and RL-1 slips reflect the employee's cumulative amounts. NOTE: This operation is sometimes necessary if you use maestro* during the year and errors are created when entering employees' cumulative amounts. NOTE: Enter the amount of the adjustment as a positive or negative value, as the case may be.
|
Changing employees' slips without having to adjust the cumulative amounts one by one. NOTE: For example, to change a bonus defined as non-taxable when it should have been taxable. Another example would be if no box is available in cumulative amounts for charitable donations, you can select one in box redefinition. You can change the calculation formulas for amounts displayed in each box on the slips, for all employees, some of them or one specific employee. However, this operation does not change the cumulative data in the employee's file.
|
Redefine Boxes
Redefine the boxes
- Click on the Redefine Boxes option.
All of the changes made to redefine boxes will be included when the employer’s summary is printed.
Box redefinitions are saved by year, which allows you to reprint slips reliably in subsequent years. Forms used will always be those approved for the current year.
For linked employees, boxes must be redefined on the employee's record with the lowest number.
For example, if employee 1 is linked to employee 2001, the boxes must be redefined for employee 1.
Configuration icon
This icon offers two interesting functionalities:
- Closing of previous years be selecting the Closed column in line with the years. By doing so, it will then be possible to modify the box redefinitions of previous years.
- Possibility of making inputting the province mandatory in the box redefinitions.
- Enter the required information in the Filters / Default Values tab:
This section can be used in two different ways:
- As a filter to display only box redefinitions that have already been entered by using the settings explained below and by clicking the Filter Data According to Specified Parameters icon:
OR- As a default value to facilitate the entry of data in the Details section.
To enter multiple values, simply enter at least the three following pieces of information:
- Select the form.
- Select the box that needs to be redefined.
- Select the Filling Grid Mode.
- Filters/Default Values section:
The information is automatically moved to the Details as Default Values section when a line is edited or if there is a filter with the Filling Grid Mode.
Field
Description
Taxation Year
Taxation year selected in the Select the Taxation Year option of the Print T4 and RL-1 program.
By default, if the year is not changed, this is the -1 active year.
NOTE: You can also change the taxation year in the define boxes screen if no filter has been applied.
However, this change is not made to the Print T4 and RL-1 Program automatically when you leave the screen.
If a filter has been applied, simply click Enter New Filter Parameters to change the taxation year. Otherwise, you will not be able to change the taxation year.
Form
Lets you select the form to be modified.
The choices are: T4, RL-1 and T4A.
Box
Box on the form to be modified.
NOTES: The drop-down list can be used to view all of the boxes based on the selected form.
Press F7 to access a search window in which all of the boxes will be displayed based on the selected form.
You can display all existing box redefinitions by not specifying any boxes and clicking the Filter Data According to Specified Parameters icon.
Default Formula
Default formula that represents the selected box.
For additional boxes, the formula is displayed as is the corresponding box number by default.
Province
Used to specify a province of employment applicable to box redefinition.
Employment Insurance
Employment insurance rate to be applied.
NOTE: For RL-1 and T4A forms, the selected employment insurance rate is combined and cannot be changed.
Committee
Lets you filter the data based on a committee or specify to which committee the redefining of a formula applies as a default value when creating a new line.
Work Category
Lets you filter the data based on a Work category or specify to which Work category the redefining of a formula applies as a default value when creating a new line.
Employee
Lets you filter the data based on an employee or specify to which employee the redefining of a formula applies as a default value when creating a new line.
Company
Payroll Company
NOTE: Available in multidimensional mode only.
- Massive Change section:
This section lets you automatically apply a formula or an additional box to all lines in the grid.
Refer to the Filling Grid Mode section for more powerful performance.
Field
Description
Formula*
Formula to be applied to all lines.
NOTE: To access the variables for a formula, press the F7 key or the (...) button.
For more information, refer to the To Enter a Formula section.
Additional Box No.
Box number to be printed on the form.
NOTES: This field is only relevant if the Box field matches an additional box and applies to all lines in the detail grid.
For RL-1 slips, you can access additional information from the government of Québec by pressing F7 or clicking the (…) button.
To apply the formula and/or the additional box number to all lines in the grid, simply click the Massive Change icon.
- Filling Grid Mode section:
This section makes it easier to enter data in the grid when you want to enter formulas based on a committee, employment category or employees. The grid is completed after clicking the Filter data according to specified parameters icon.
If no choice has been made in this section, the grid only displays existing formulas and box redefinitions according to the filters entered.
Field
Description
Committee
Displays all committees whether a formula has been defined or not if the box is checked.
NOTE: The committees displayed are from Define Committees option.
Work Category
Displays all employment categories that have a formula or not, if the box is checked.
NOTE: The employment categories are from Define Work Categories - Payroll.
Employee
Displays all employees whether a formula has been defined or not if the box is checked.
NOTE: The employees are from Employee Management - Payroll.
Employees are displayed according to the following criteria:
For a linked employee, only the first number will be displayed based on the numeric code because you cannot redefine a box for the 2nd employee of a linked employee.
By entering the 2nd linked employee number, the number will be replaced automatically by the lowest employee number and a message will be displayed to indicate the change.
For example, if employee 1 is linked to employee 2001, when you enter employee 2001, this number will be replaced by 1.
The employee must have a payroll cumulative in the taxation year if a province has been specified in the filter.
For a T4A form, only employees whose T4A section has been completed in Employee Management will be visible.
For remaining forms, these are employees who are not self-employed.
- Click the Filter data according to specified parameters.
If the filter is used in the Filters / Default Values section, the grid only displays the results of transactions sought. If there are new transactions, the default values entered are displayed in the grid so that the user can complete the missing information.
View the box redefinitions of the previous year
Click the icon to the far right of the Definitions of the Previous Year section at the bottom of the screen.
This section displays the box redefinitions for the year that precedes the current taxation year. This section is completed based on the filter in the Filters / Default Values section at the top of the screen.
Copy a formula used in the previous year
From the section maximized at the bottom of the Definitions of the Previous Year screen, select the formulas to be copied using the selection column.
|
To select all of the formulas from the previous year, right click in the Definitions of the Previous Year grid and select the Check All option. |
- Click the Copy the selected items to the current year icon.
- Complete or enter the required information in the Details tab:
You can add a formula based on a company (in multidimensional mode), province, work category, committee or employee.
By leaving one of the fields listed above empty, all of the empty values will be assigned by the formula.
You can determine the number of lines required in the breakdown grid by clicking the Configuration icon.
You can use the Search field to enter a value and search for it in the grid by clicking the
icon or by pressing F3.
Only the fields that require additional explanation in the details section are documented. For the other fields, please refer to Filters / Default Values section.
Field
Description
Box*
Number of the box to which the formula should be applied.
NOTES: The box numbers are available depending on the form selected.
Press F7 to access a search window in which all of the boxes will be displayed based on the selected form.
Employment Insurance Rate*
Determines the employment insurance rate to which the formula should apply. Available values:
Combined Rate
Applies to the regular and reduced rates according to the payrolls for the year.
Regular rate
Applies to the regular rate only.
Reduced Rate
Applies to the reduced rate only.
Formula
Amount or formula to be calculated to be applied to the box.
NOTES: For an amount, you cannot use a comma (,) as a thousand separator.
To access formula variables, press F7.
For more information, refer to the To Enter a Formula section.
Additional Box No.
Box number to be printed on the RL-1, T4 or T4A form.
NOTES: This column may be edited and mandatory if it is an additional box, otherwise, it cannot be edited.
To enter a box number, simply type the box number directly (for example, 55) on the corresponding line in the Additional Box No column.
For the RL-1 form, you can access additional information from the government of Québec by pressing F7.
Enter a formula
The formula must be entered in the Formula field. Enter either variables or numbers.
|
|
There are three methods for entering formulas:
|
The formula applies to an exception only:
- When you double click in the Formula field, the Formula Definition window is displayed with the different variables available.
Zone
Description
1.
Section where the formula must be defined.
2.
Bidirectional arrows to move the selected variable to add it to or remove it from the formula.
3.
Mathematical operators that can be used in the formula.
4.
List of variables with their descriptions.
5.
The blue arrow applies the default formula linked to the selected box.
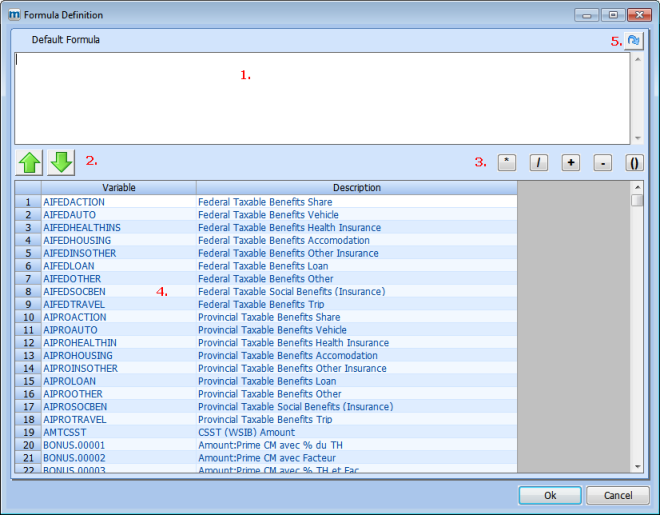
Simply select one variable at a time at the bottom of the screen (zone 4) and move it using the arrows (zone 2) to the Default Formula section. For more complex formulas with multiple variables, we recommend using mathematical operators (zone 3).
- When you have finished, click OK to close the Formula Definition screen.
The formula applies to multiple employees, committees or work categories:
- Determine the fields defined in the Filters / Default Values section at the top of the screen.
- Click the Filter data according to the specified parameters icon. The grid in the details section is completed based on the previous step.
- Define the formula for each line if it differs. Otherwise, enter the formula in the Massive Change section.
The method for defining a formula is the same as described in the Formula applies to exceptions only section.
To apply a mass update to the grid, simply determine the formula and click the Massive Change icon.
- Click Save to save the changes.
- Click Quit to exit Redefine Boxes option.
Data Generation
This option is used to compile payroll information to prepare data for printing the T4 and RL-1 slips.
|
Companies that produce greater than 50 slips must send them electronically in XML format. If you must prepare files in XML format, you must first complete the T4 & T4A and RL-1 tabs in configuration for Payroll before generating the data. |
Generate the data
- Click Generate Data.
When data is first generated at the beginning of the year :
Maestro* checks whether box redefinitions are required for the current year. If no box redefinitions have been defined for the current year, maestro* copies the global box redefinitions** from the preceding year to the current year.
**that apply to all employees
No copies will be made for global box redefinitions in the current year or if the box redefinitions apply to specific employees.
- Select one or more Employees.
By default, all employees are selected by clicking the All box. You can display the columns to suit your needs by clicking in the grid with the right mouse button to select the Configuration option.
- Select the Province.
- Choose whether the file should be generated or not for the federal and/or provincial governments.
Please note that the provincial selection may not be available if the province of Québec does not exist in Government Tables.
If checked, select the Sending Type as required. The first file generated must be Original.
- Click Accept to generate the files.
Note the names of the files created. You can change the directory in which they are saved by clicking the Configuration icon.
Data will not be generated for employees who do not have a social insurance number.
Pay particular attention to the various messages displayed on the screen as they can provide information about problems. To find out more about the various messages and the possible solutions, please refer to the Appendix.
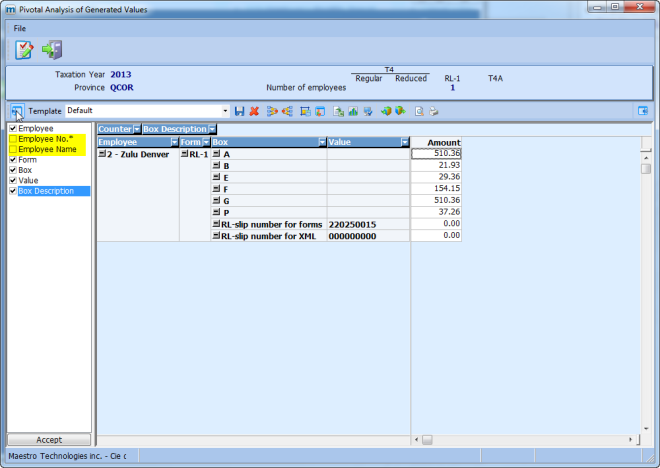
Pivotal Analysis of Generated Values
The dynamic vector-based analysis of generated values displays the amounts per form, box and employee. This analysis is displayed based on the province of employment.
|
The dynamic vector-based analysis of generated values displays all information from the boxes, including the additional boxes. |
View the Pivotal Analysis of Generated Values
- Click Pivotal Analysis of Generated Values.
- Select the Province.
- Select the form(s) for which you want to see the values.
- Click OK.
- A dynamic vector-based analysis window is displayed. At the top of the screen, the system displays the number of employees for each form processed.
- Click a standard template provided by maestro* and identified by an asterisk in order to access a basic D/V analysis.
Using the icon shown in yellow, you can display the Employee No. and Employee Name columns to filter the data by employee.
Employer's Summary
The employer summary is used to print a summary report of cumulative amounts for the T4, T4A and RL-1 slips. This report is printed based on the province of work.
Print the employer summary
- Click Employer’s Summary.
- Select the Province.
- Click OK.
In Québec, a message is displayed if the payroll for you company does not reach the maximum payroll applicable for the Health Services Fund (HSF).
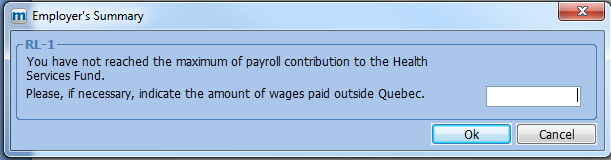
- If the message is displayed, you must enter the amount for gross wages paid to employees outside Québec. Click OK to continue.
This amount will be added to gross wages to calculate the percentage of HSF to be applied. If this situation does not apply to your company, leave this field empty.
- Repeat the steps above for each of the provinces.
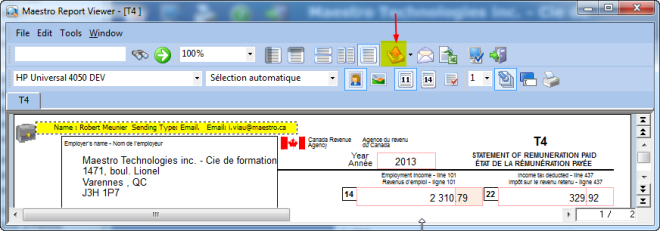
Print T4, T4A and RL-1 Slips
This function prints the T4, T4A and RL-1 slips. You can also print an employer copy. It is printed based on the province of employment and the forms are printed individually depending on the type of slip (T4, RL-1 or T4A).
To print a T4, T4A or RL-1
- Click the T4, T4A and RL-1 option.
- Select the Province.
- Select the Type of Slip to be printed.
- Click Accept.
Repeat the steps for each form and for each of the provinces.
To print T4A slips for sub-contractors, in Employee Management, you must first complete the T4A section in the Bonuses, Deductions and Income Tax tab (version 3.02) or in the Income Tax tab (version 3.03), specifying the number and name of the company. If you specified a supplier number in the Employee Identification tab, the company name is displayed automatically.
- If your forms are displayed on the screen and a tooltip is displayed in yellow at the top of the screen: By clicking the Send to All Recipients icon, you can send the form displayed on the screen to the employee by e-mail if the mailing type is Email. When you click this icon, each employee will receive his or her form. Do not confuse this with the Send an email message icon, which sends all of the forms to the same person.
EDI Transfer - Preparation of XML Files
Generate the T4/XML or T4A/XML file
- Click the Generate T4/XML File or Generate T4A/XML File option.
- Select the Province.
- Click OK.
A message displays the source file created when the data is generated and the file in which the XML file will be saved.
The reference number field is used to enter a unique number that identifies the file.
It is important to remember the directory in which the XML file was saved because this information will be required when sending to the CRA and Clic Revenu web sites. A report viewer will be displayed to indicate whether or not the file contains errors.
If the file contains errors, the corrections must be made in the application and you will have to repeat the steps starting with Generate Data.
- Repeat the steps for each type of slip to be printed and for each province.
Generate the RL-1/XML file
- Click the Generate RL-1/XML File option.
- Select the Province.
- Click OK.
A message displaying the source file information and the location where the XML file will be saved will be displayed. Click OK to accept.
The name of the XML file is represented by the last two digits of the year, the number of the preparer and the last three digits in the numerical sequence. A report viewer will be displayed to indicate whether or not the file contains errors.
If the file contains errors, the corrections must be made in the application and you will have to repeat the steps starting with Generate Data.
Validate an XML file
Click the XML Validator option to check the files before sending if you have not read the messages in the preceding steps. Select the form to be checked and click OK.
|
The name of the XML file is represented by the last two digits of the year, the number of the preparer and the last three digits in the numerical sequence. A report viewer will be displayed to indicate whether or not the file contains errors. If the file contains errors, the corrections must be made in the application and you will have to repeat the steps starting with Generate Data. |
See also
- Government Remittances
- Miscellaneous Reports
- Define Earning/Deduction Codes
- Employee Management
- Work Category Management
- Government Tables
- T4 and RL-1 Control Report
- Preparing T4 and RL-1 Slips For an Indigenous Employee
APPENDIX
Messages that may be displayed under certain circumstances
Message 1
This message is displayed if there are box redefinitions for specific employees, for the preceding year, and if maestro* does not find them in the box redefinitions for the current year.
If the user clicks YES, the data will be generated. If not, processing will be stopped.
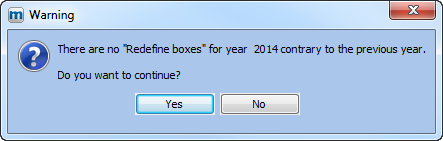
Solutions:
- Check whether the box redefinitions for employees for the preceding year still apply for the current year. If yes, copy the box redefinitions for the current year.
- Repeat the Generate Data step.
Message 2
This message is displayed if no SIN has been entered for an employee. Data will not be generated for this employee.
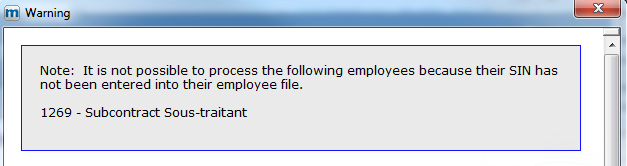
Solutions:
- Access Employee Management and enter the SIN.
- Repeat the Generate Data step to correct the information.
Message 3
This message is displayed when maestro* finds amounts, in payroll, susceptible to affect the additional boxes but there are no box redefinition for them.
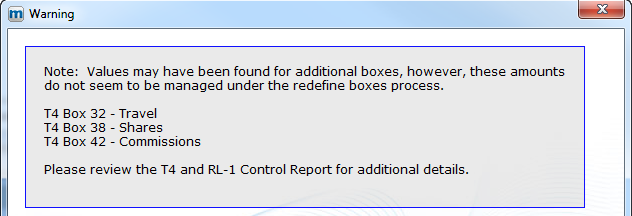
Solutions:
- Print T4 and RL-1 Control Report.
- From the T4 and RL-1 Control Report, check the amounts in additional boxes and define these additional boxes in Box Redefinition in the Prepare T4 and RL-1 option.
- Repeat the Generate Data step to correct the information.
