Security and Access Management in maestro*
If there's an area where Maestro puts in a lot of effort, it's security! Like any enterprise resource planning software, maestro* leverages and works with a large amount of confidential data. While some of this data can be shared with key users, there is a portion that must be restricted to very few users. To meet the many different needs of its clients in terms of security management, Maestro offers a variety of functionalities dedicated to that purpose.
|
|
- User Group-Based Security Profile
- Security Applied to a Company
- User in Charge and Transaction Modifications
- Financial Restrictions
- Guide Access
- Security Limitations
- Appendix – Password Management Best Practices
User-Based Security Profile
Before anything else, each employee that will work with maestro* has a user profile created for them. Various security accesses and settings are attached to that profile, ensuring that this basic security level is assigned on an individual basis.
|
|
The maestro* Administrator Each organization must first designate one or several maestro* administrator(s). An administrator actually has every right and access to the software. They are in charge of creating the others users' security profiles as well as carrying out the majority of the maestro* configuration. |
User Code and Number
Each new maestro* user is assigned a user code and number. With the exception of maestro*CLOUD users, whose code should be their email address, there are no restrictions when assigning a user code. This code, paired with a password, enables users to access maestro* and/or maestro*MOBILE. As for the user number, it is generated by maestro*. It cannot be modified and is linked to the data themselves.
|
|
It is recommended to never reuse a user name. In addition, the user code’s history is stored and statistics on the user's various accesses can be provided. |
Password
Like any good software, the access to maestro* is protected by a password. Originally given by the administrator, it can be modified by the user themselves according to a preset schedule and/or the next time they log on to maestro*.
|
|
Please note that passwords used to access maestro* 3.05 MSSQL must comply with the rules below:
As well, the user code cannot be used as password. |
|
|
It goes without saying that maestro* passwords must never be shared with anyone. Furthermore, after creating a new user’s security profile and issuing their original password, the maestro* administrator can log on as that user to check their configuration and accesses. To learn more on password best practices, refer to the appendix titled Password Management Best Practices, located at the end of this document. |
Access Types
Each user is also assigned an access type corresponding to the maestro* product(s) to which they have access as well as their the connection type . A user can have access to:
- maestro* only (through the internal network connection);
- maestro*MOBILE only (i.e. the application);
- the maestro*MOBILE employee mode (which only enables users to complete timesheets in the maestro*MOBILE application );
- maestro* and maestro*MOBILE;
- maestro*CLOUD (when a user accesses maestro* through a Web service).
|
|
Needless to say, the maestro* access type doesn’t necessarily provide access to all maestro* modules, functionalities, and data. Initially, only those modules purchased by the client are available; several other parameters play a role in access assignment. Though an administrator can create as many exclusive maestro* user accesses as needed, the quantity of maestro*MOBILE users is limited to the number of maestro*MOBILE licences purchased by the organization. Therefore, when a new employee requires a maestro*MOBILE licence, the administrator must either deactivate an existing *MOBILE user or purchase an additional licence. |
Security per Project
Here again, maestro* allows the application of security per project on an individual basis, enabling users to access information on all projects, selected projects, or projects of a specific type or category.
|
|
Assigning types and/or categories to projects makes project security management easier. It ensures that administrators don’t have to individually indicate if each maestro* user can access the project’s information when creating a new project. |
Moreover, it is possible to allow or deny viewing amounts and/or quantities entered for each of these projects’ revenue or expense group.
|
|
It’s also worth mentioning that it’s possible to restrict access to each account created in the accounting structure through the creation of security groups and the further allocation of a security group code to each of those accounts. |
Access to Employee Data
For each user, the administrator must specify what kind of access they will have to employee information, either full access to all employees, no access at all, access to a specific group of employees, or to some employees only. If the access to one or several employees is assigned, it becomes necessary to specify if this access should be restricted or not. When it must be, it is possible to hide the employees’s contact data, allow or deny access to document management, and hide or show the employees’ ID (number, name, SSN) and/or their salary (rate, amount) in reports and inquiries. As well, when a user can access Employee management, the administrator can decide to allow viewing and modifying specific information only. This way makes sure that only payroll employees have access to the information required for them to perform their tasks and nothing more.
Access to Companies
When the organization manages more than one company, maestro* allows identifying to which one(s) a user will have access when logging on to the software.
|
|
Also refer to the security as applied to a company section. |
Individual Restrictions
Besides the accesses already introduced, a wide variety can be added – also on an individual basis:
For instance, the administrator will be in charge of granting (or not) specific access rights and restrictions to the vast majority of maestro* modules and options that will apply to:
- various financial statements and reports;
- transaction transfers;
- viewing information on equipment, service contracts, and quotations (restrictions applied by tab);
- quotations, change orders, orders, etc., based on their status;
- viewing profitability and orders and sales amounts;
- creating credit notes and/or modifying order prices;
- modifying budgets and viewing project totals;
- viewing quotation prices;
- confirming timesheets and modifying those that have been transferred sont;
- creating and/or duplicating reports and dashboards in maestro*BI;
- etc.
|
|
In maestro*, there’s also a functionality that copies a source user’s security settings to another. It’s especially useful for employees that have a comparable position and/or tasks, for instance, employees from the Accounts Payable department. In fact, it’s much quicker and safer to copy an existing security profile – even if it means tweaking it later on – than to create separate security profiles for each user if their profiles are virtually identical. This functionality is also used for employee departures and arrivals to duplicate similar security profiles. Display parameters (such as a grid’s visible columns) can also be copied from one employee to another. |
Document and Email Protection
In maestro*, a contact is any entity that an organization deals and communicates with, and for which information such as its details (phone number, etc.) must be listed. These contacts may be individuals, businesses, or even locations. It's why maestro* contacts includes employees and users, customers, suppliers, subcontractors, etc.
For each of these contacts, it’s possible to specify a password that will be required to open attachments sent through mass mailings. This functionality is particularly interesting when sending pay stubs to employees!
In short, maestro* offers a high level of accuracy when it comes to individually providing or restricting access.
|
|
Multi-Factor Authentication for maestro*CLOUD Users Nowadays, a single-password authentification has become insufficient. Clients that have the Microsoft Office suite installed on their workstation benefit from the Multi-Factor Authentication access type, also known by its acronym MFA. The MFA helps authenticate a person using two (2) of the three (3) following factors:
The use of maestro*CLOUD, however, is not done from Microsoft Office; users must instead go through the SMTP communication protocol to transfer emails from maestro* to an email server and vice versa. Notable fact, using SMTP requires that the multi-factor authentication be activated to ensure that only recognized sites have the permission to transmit emails through Office 365. To benefit from a multi-factor authentication with SMTP, Maestro proposes two alternatives to its maestro*CLOUD clients. The main solution involves generating in Office 365 a special password that provides access to Office 365 and set up this password in maestro*. For more information on this topic, refer to the document titled Office 365, Multi-Factor Authentication, and maestro*. |
User Group-Based Security Profile
In conjonction with a user’s individual security profile are the security profiles linked to the user groups that a user is a part of. Every user created in maestro* must be assigned to a user group. This means that a second security level is added to to the first (individual) one. It’s main purpose is to limit the access to maestro* modules and options. These restrictions s'apply to all users that are part of the group. When there’s a change made to the security at the user group level, all the group’s users are impacted.
A maestro* user group can then be described as a group of employees that have similar profiles and/or roles. User groups are created based on the size, employee composition, and needs of the organization. For example, they could be the following groups: management, regular employees without access to payroll, regular employees with access to payroll, project managers, mobile technicians, administration, etc. For each user group, the administrator must specify the security types, access levels, and module accesses. The administrator also decides how many user groups should be created to ensure the optimal conditions in managing the organization’s security.
|
|
A user can only be linked to one user group. |
Access Levels
Each user group is also assigned to one of the possible maestro* access levels which, depending on the installation type, can be Administrator, Local Administrator, Standard, maestro*MOBILE Employee, and Technical.
As mentioned earlier, the maestro* administrator – who is a main or a head user – holds access to all the modules purchased by the organization. This is the person in charge of granting access rights in maestro* and setting up security-related parameters. This person is assigned the Administrator access level. A local administrator also holds access to all modules, however, they are limited to the companie(s) to which they have access (see the section on security by domain). Employees who only access maestro*MOBILE to complete their timesheets have a maestro*MOBILE Employee access level whereas all other employees are assigned the Standard access level which corresponds to customized accesses. Last, the Technical level is reserved for technicians who deliver technical support as well as, sometimes, make the backups and perform the maestro* updates. This access level provides them with access to maestro* to ensure the system is functional without letting them see sensitive data (such as the organization’s fininancial information).
Module Access
Other than providing the possibility to restrict which options user groups can see, as well as limit their access to only view information – or instead be able to insert, modify or delete it, maestro* offers the opportunity to select precisely each option, option group, sub-module, and/or module that a given user group can access. It is therefore possible to display the Payroll module in the maestro* menu exclusively for the payroll employee group and the administrator. In the same way, the access to some of the Accounting module’s options and their view can be restricted for the majority of user groups and it is possible to limit the access to each account created in the accounting structure through the creation of security groups and the further allocation of a security group code to each of those accounts.
Security Applied to a Company
In addition to individual and user group security, there are also functionalities that can be used to apply measures at the company level.
Security Types
Maestro* provides the possibility to specify if the security must be:
- global; or
- local.
When the maestro* security is said to be global, it means that the security settings apply to all companies within the client’s organization (including the test company). In contrast, a local security indicates that the security settings only apply to the current company. In situations where a client holds more than one company, it may be a good idea to implement a different security for each company. Another client may however wish to apply the same restrictions accross all companies. Besides, when security is applied globally, any change made to the security settings impacts all the other companies. It’s the security type recommended by Maestro for the vast majority of organizations.
|
|
Any security change made to a test company will affect all the other companies in a global security context. |
|
|
Every organization using maestro* has a test company created at the time of the go-live. It is a replica of the actual maestro* company in which the organization carries out its business. As its name indicates, the test company is used for testing, training new maestro* users, etc. All transactions executed in the test company are fictitious. |
Security by Domain
Security by domain can be applied when an organization owns more than one business or division. It involves controlling the access to maestro* by company groups and restricting the access of some employees, user groups, or administrator users to the companies that are part of a company group. Furthermore, security by domain allows limiting access to data specific to one or several domain(s), the same way that maestro* restricts option access by user group.
Using security by domain offers the possibility to add a new administator access level: the local administrator, also called the assistant administrator. Users with that security level have access rights similar to that of the administrator, but are limited to the companies that are part of the domain specified in their user group. This allows the regular maestro* administrator to delegate the security management of each domain to certain people, without giving them access to companies that are not part of the domain for which they are responsible. Each domain has its own security settings and ensures, for instance, that a vice-president of finance can access information from all companies whereas a director of finance is limited to the companies that are part of his domain.
|
|
Security by domain is sometimes used when companies are managed through the multidimensional mode. |
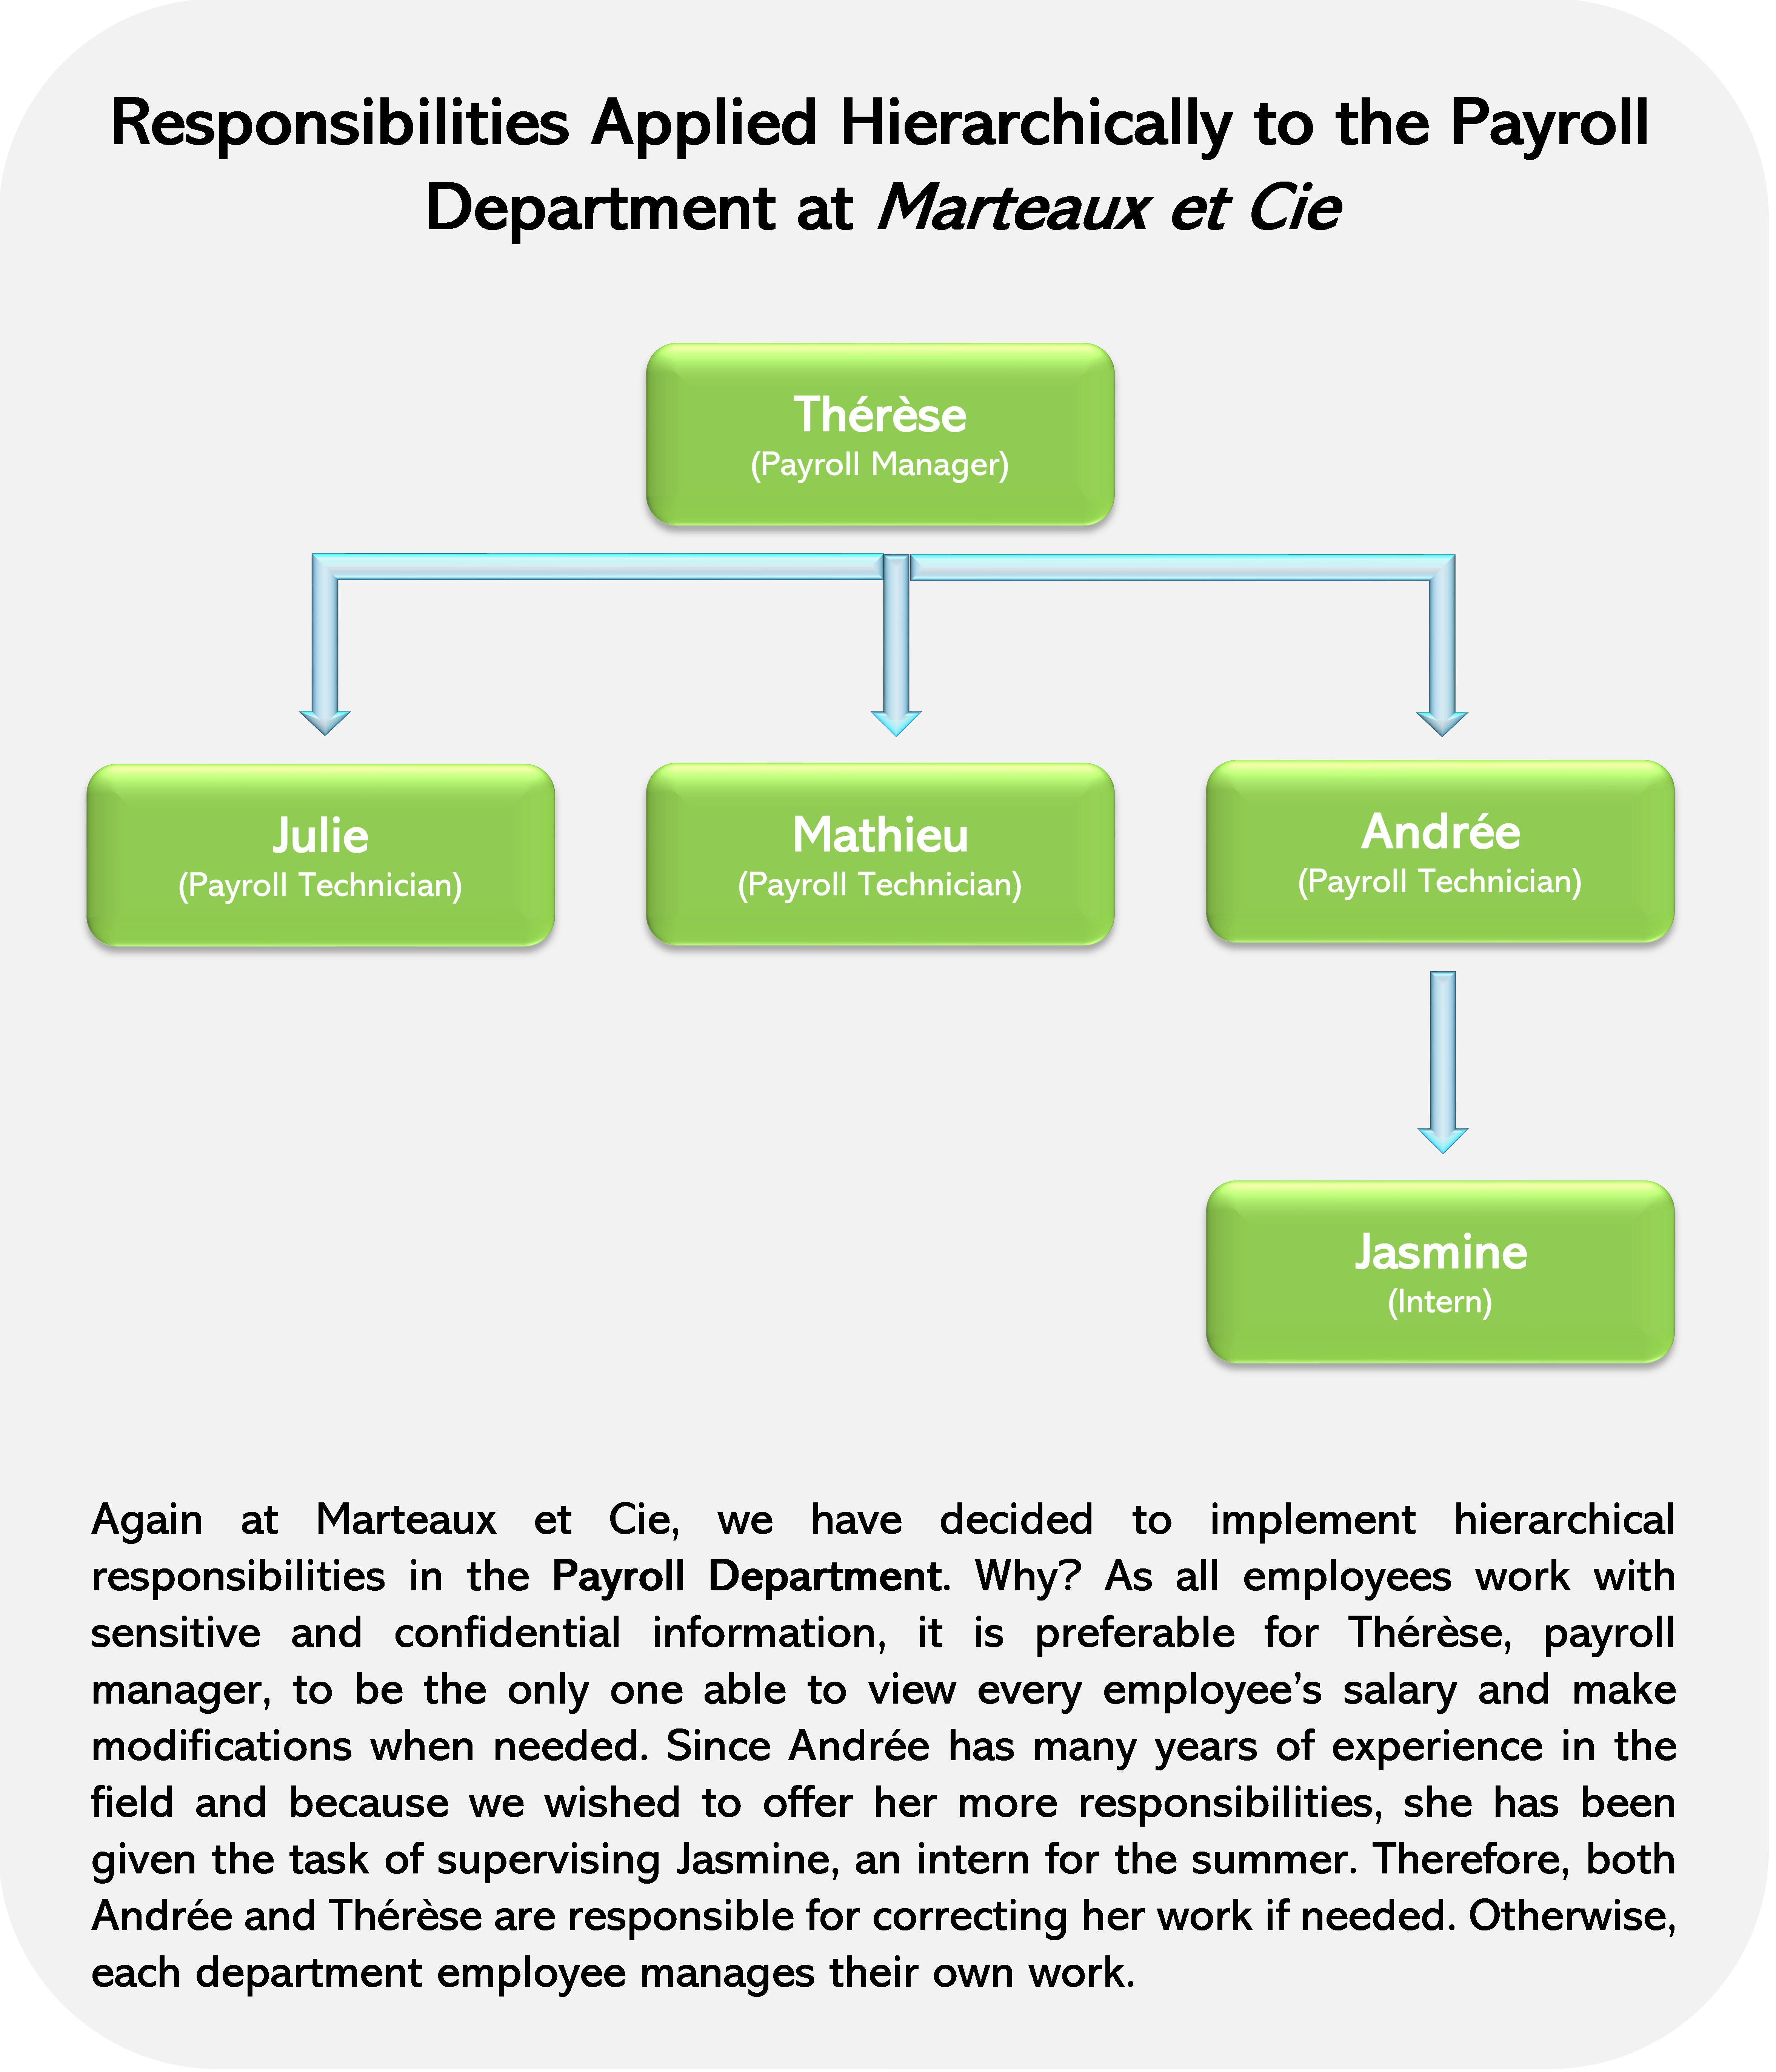
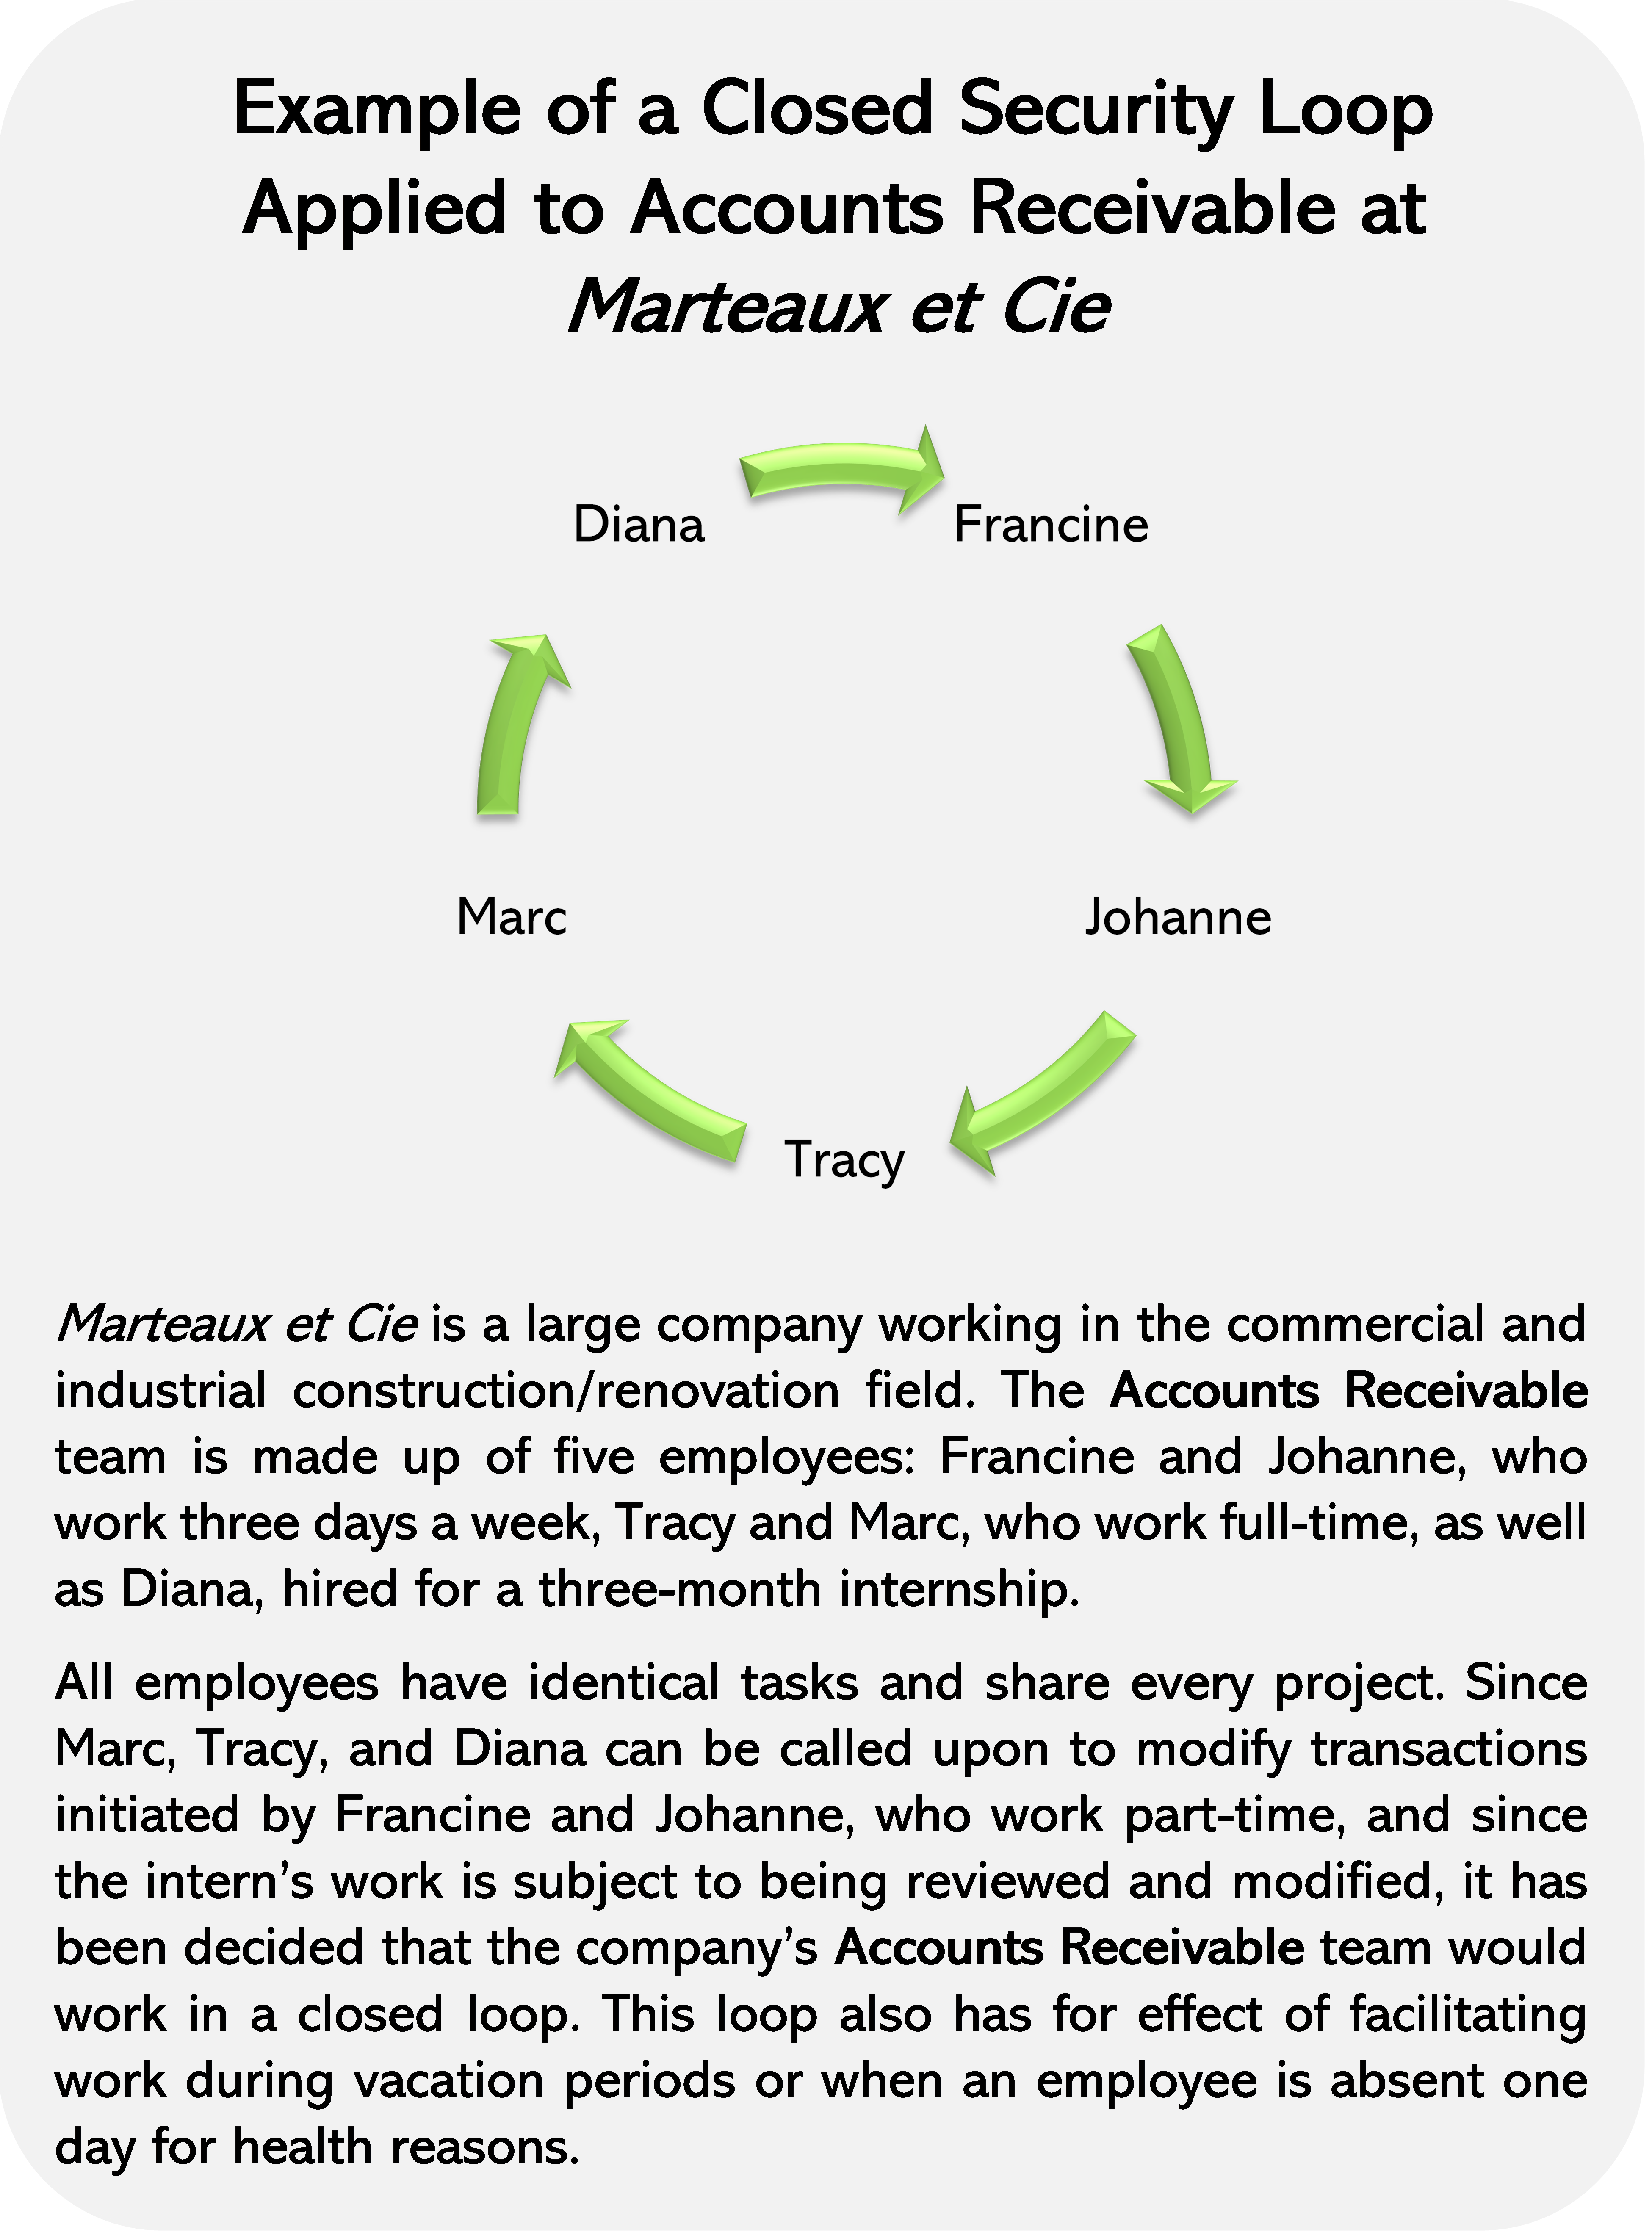
User in charge and transaction modifications
When needed, a user in charge can be assigned to any maestro* user. If required, this user in charge can modify the transactions created by the user they are in charge of. Whether as a result of different work schedules, unplanned sick leaves, summer vacations or a simple error, an employee may be required to make changes to an existing transaction, even if they weren’t the one who created it.
Lorsqu'un responsable est identifié pour un utilisateur, le responsable peut modifier les transactions de l'utilisateur mais ce droit est généralement à sens unique. En effet, dans plusieurs cas, le responsable représente un supérieur hiérarchique qui peut avoir, à l'occasion, à modifier une transaction existante initiée par un de ses employés. Il va de soi qu'il ne souhaite pas, en revanche, que ses employés modifient ses propres transactions.
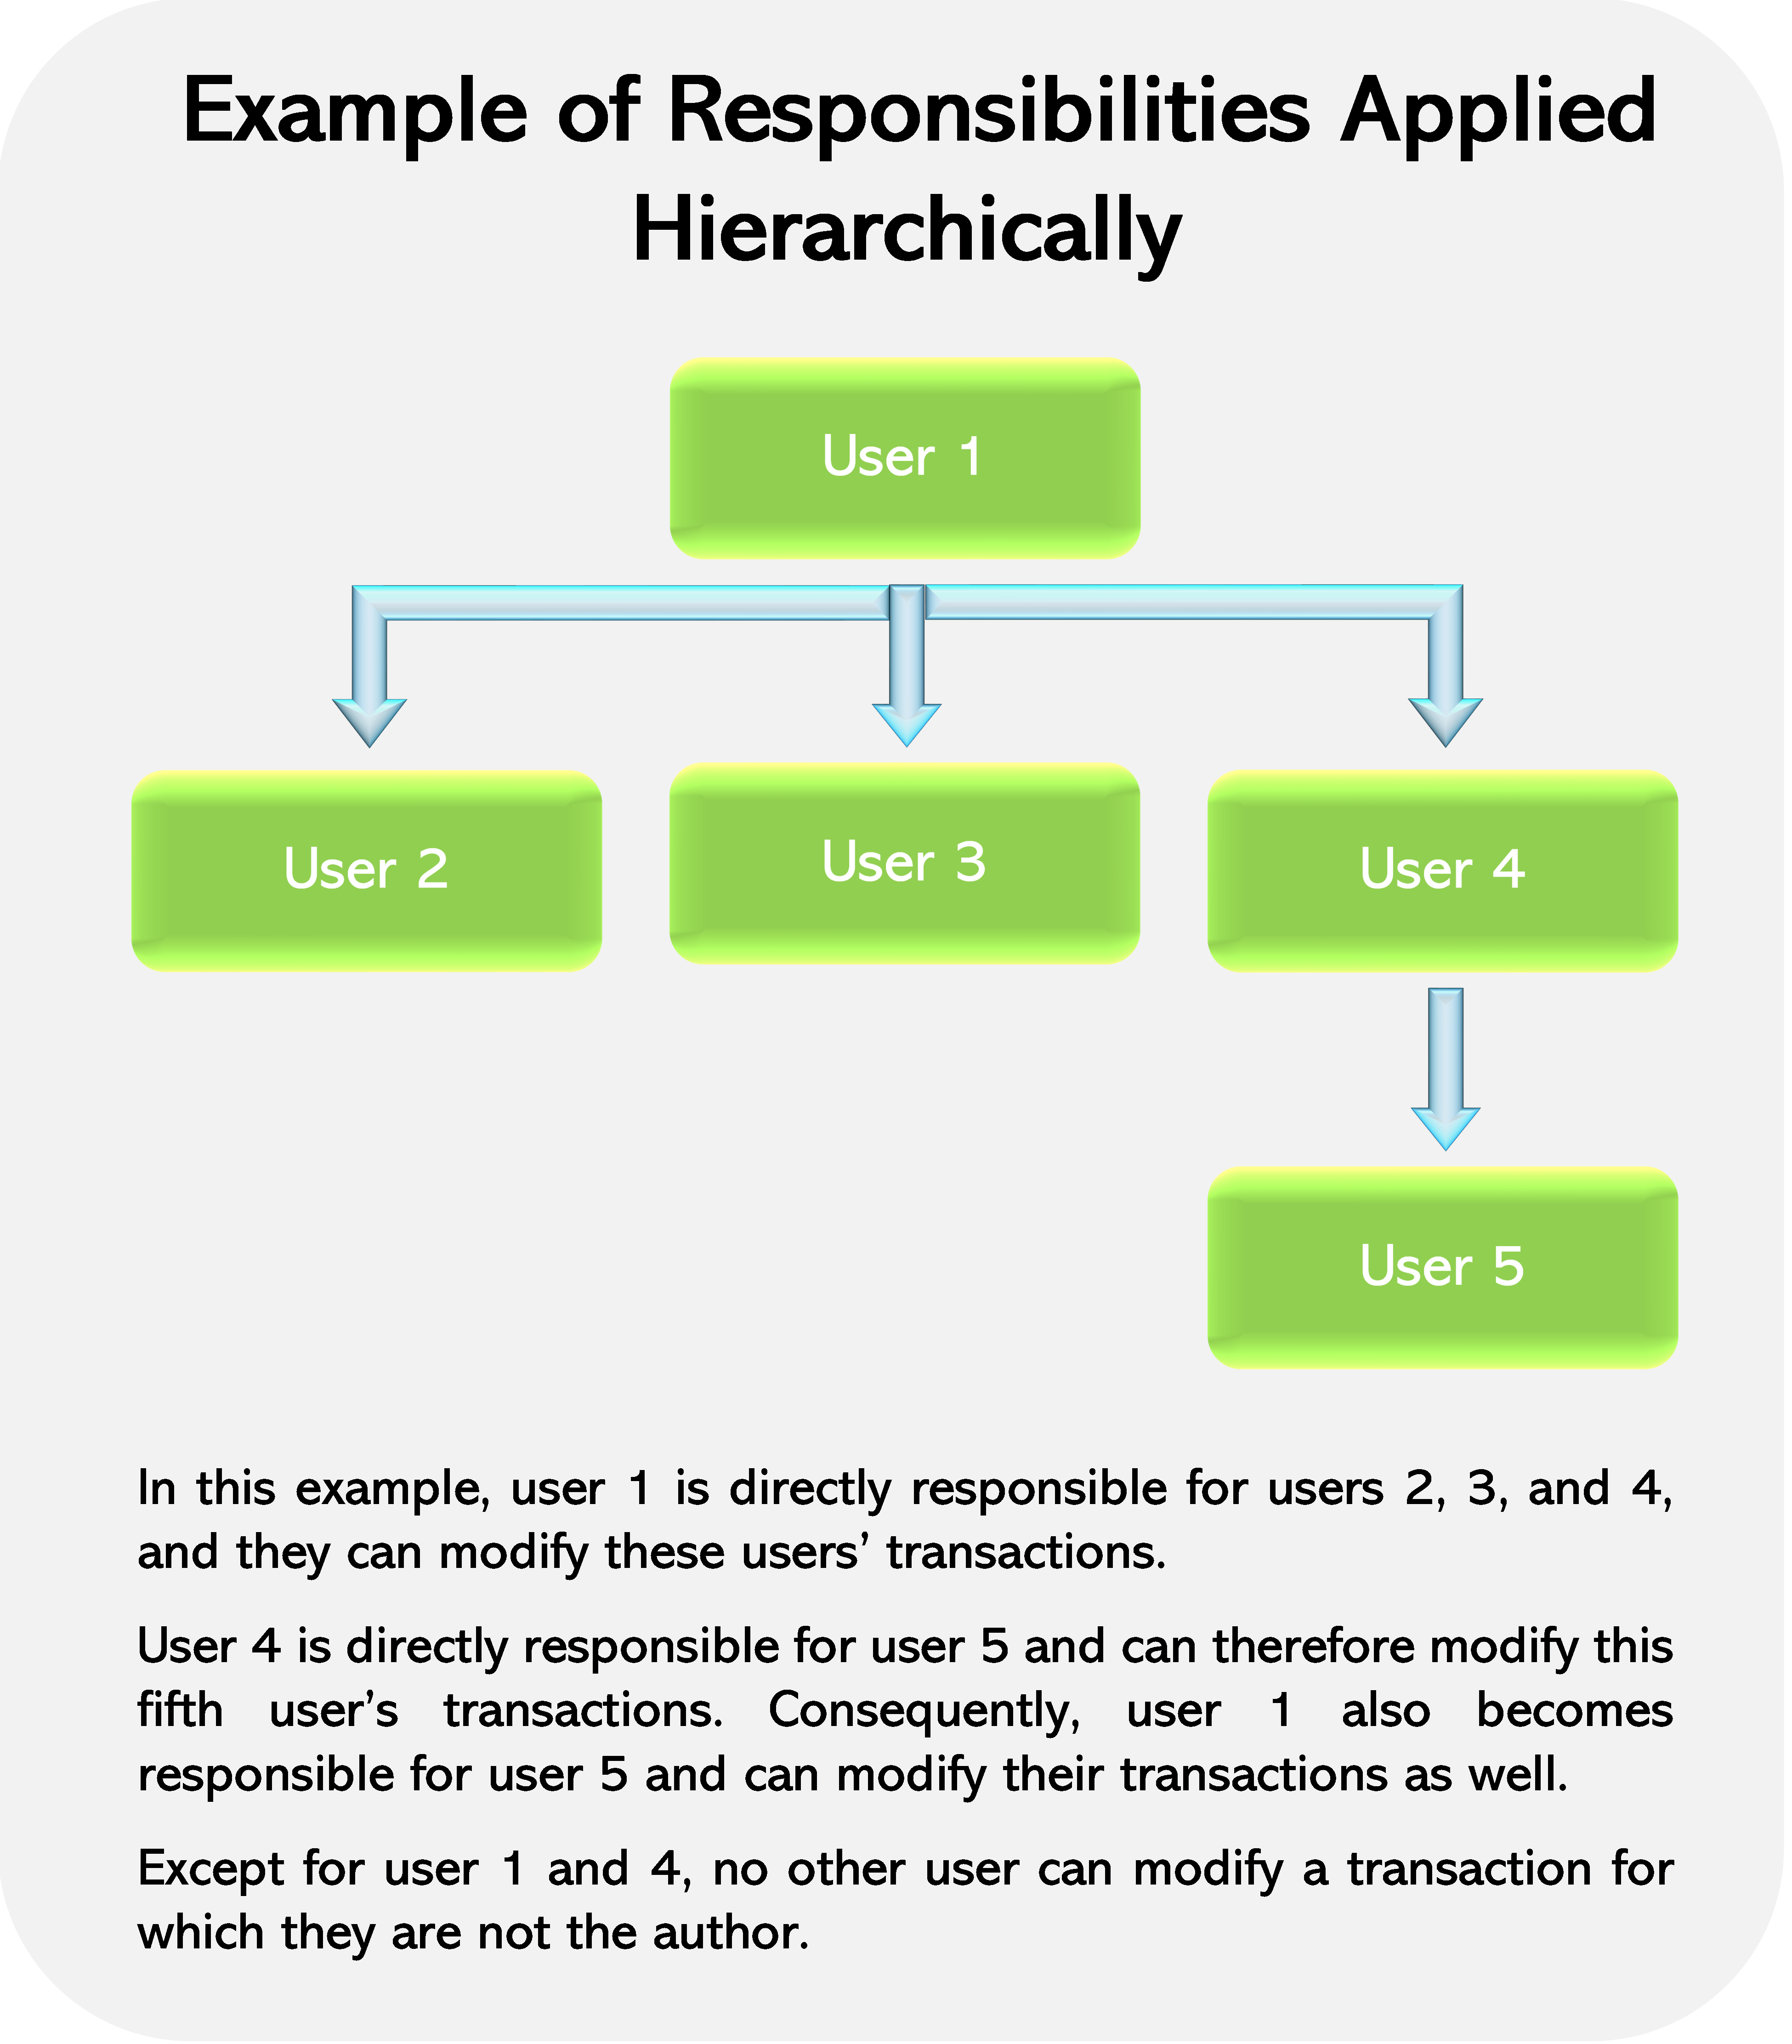
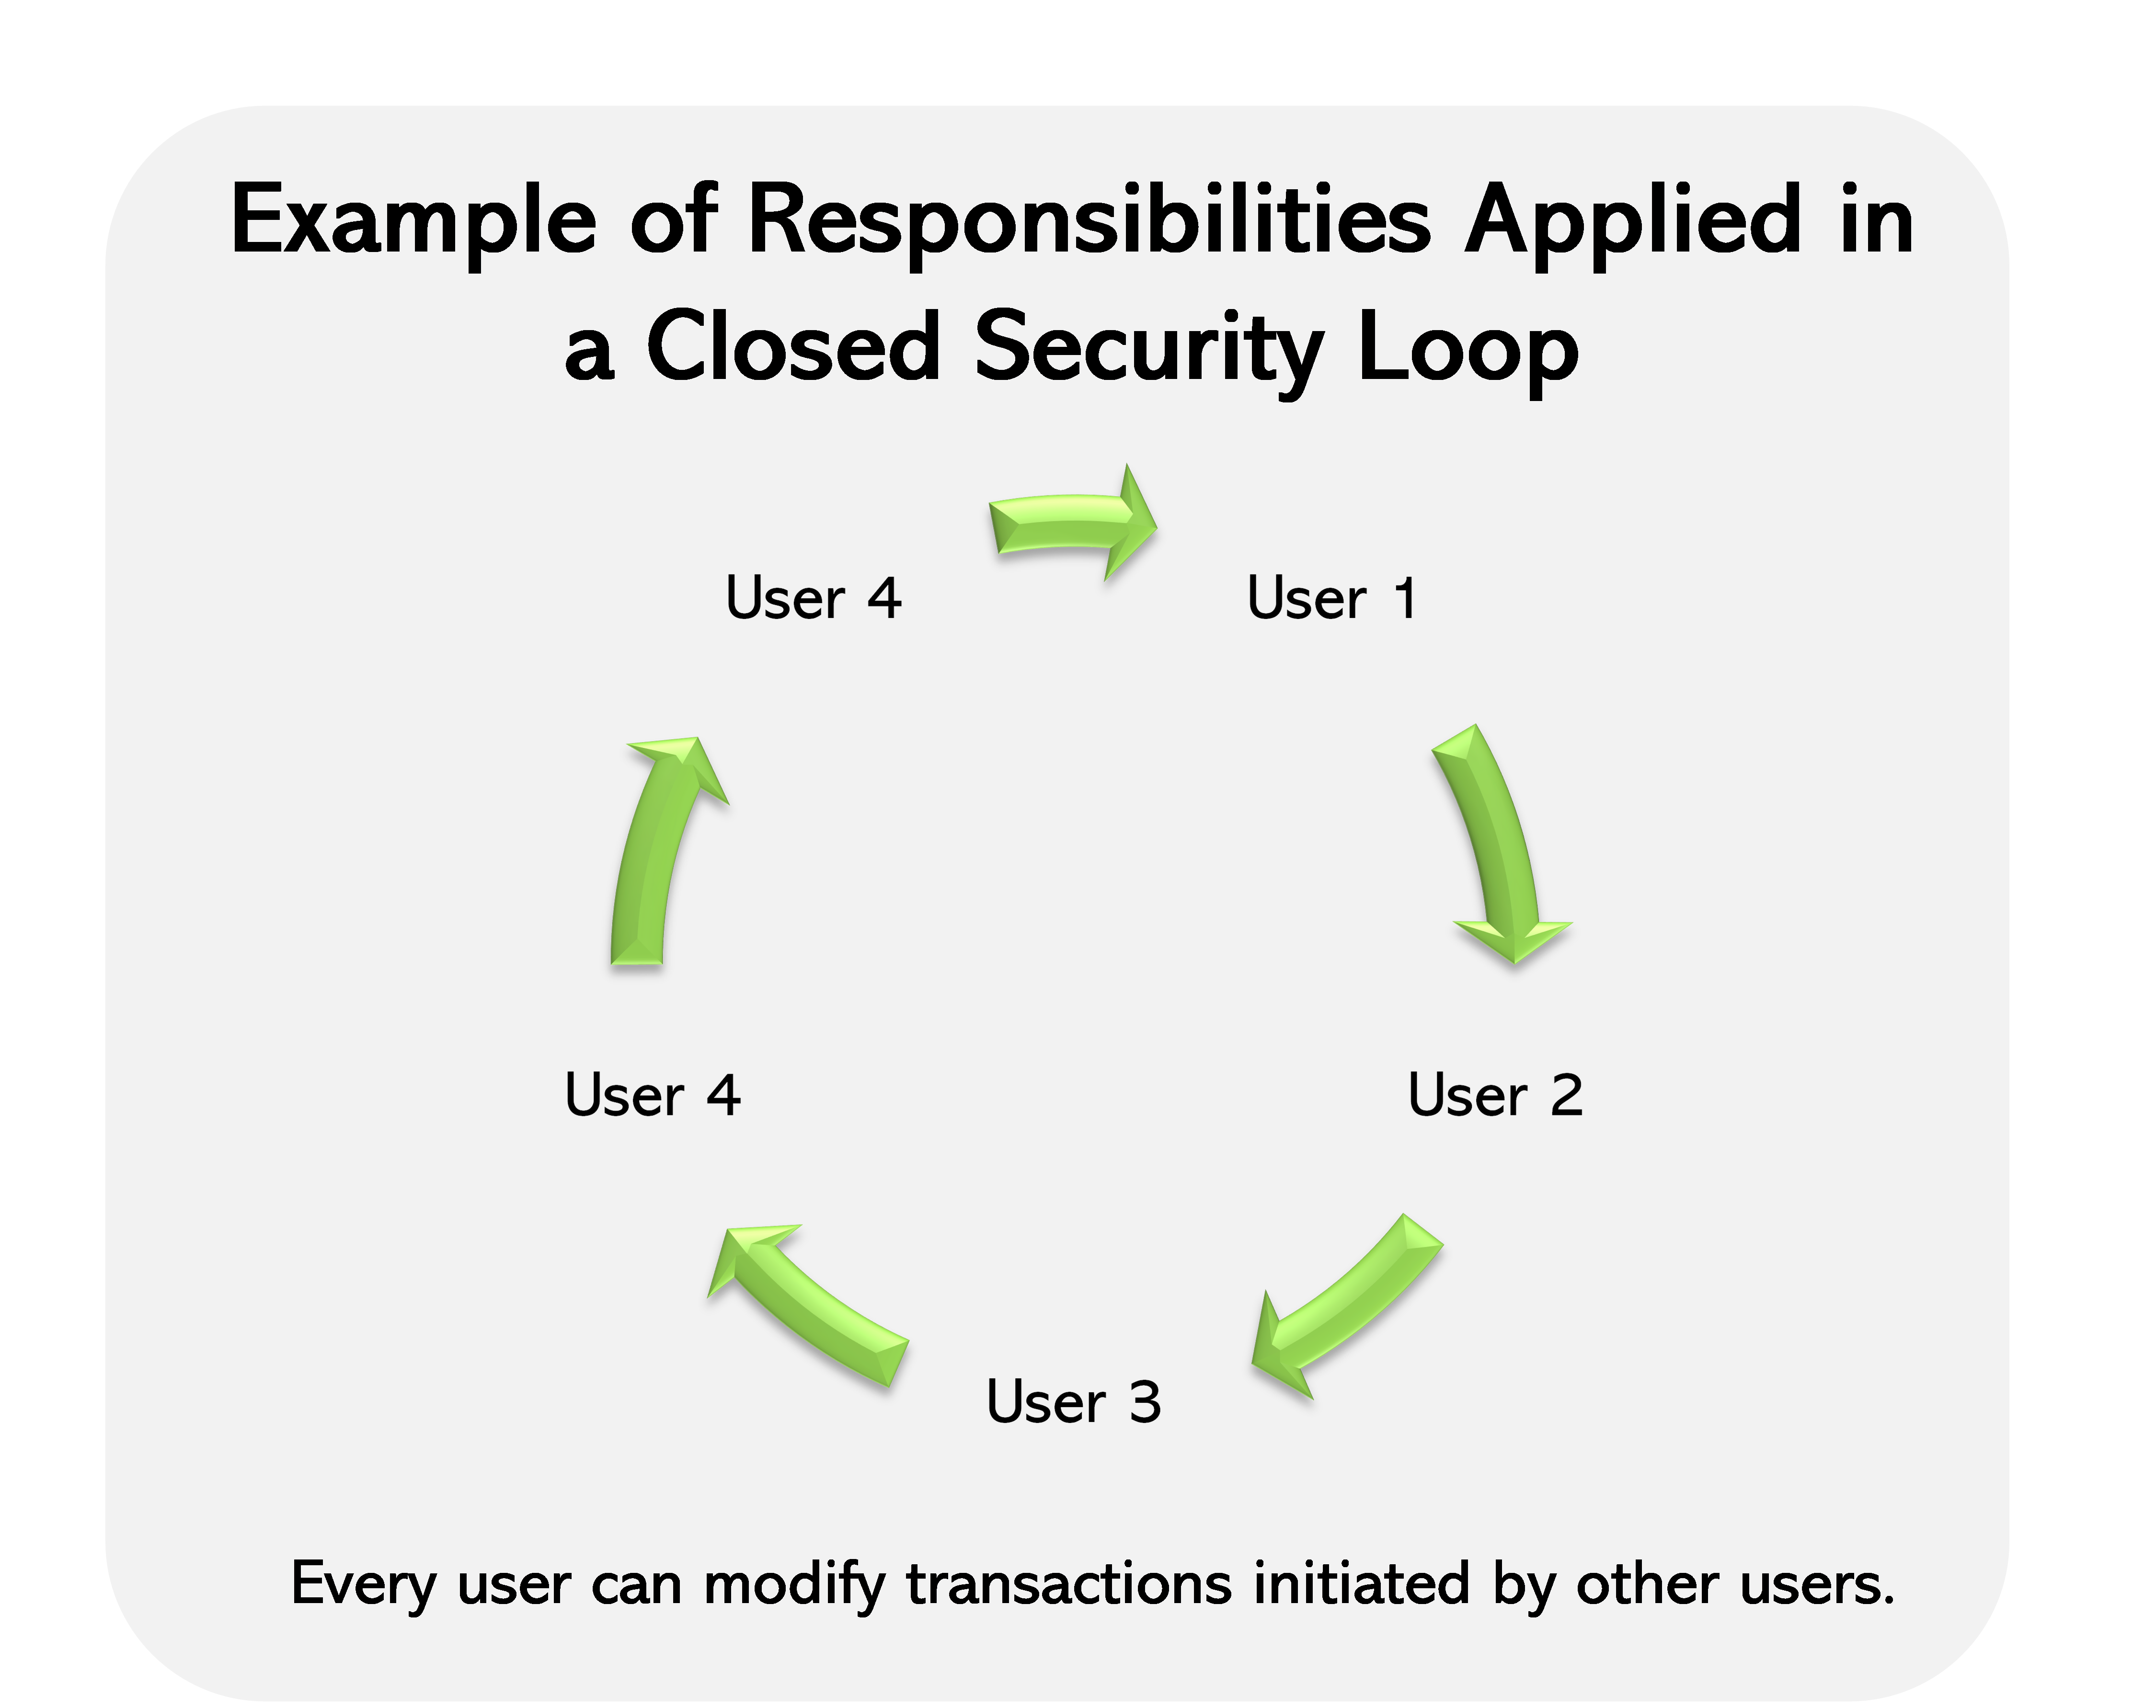
There are teams and/or circumstances where it’s preferable to have users that can modify each other’s transactions and are all in charge of each other. What is called a “closed security or responsibility loop” is frequently found in teams where all users have the same role or perform similar tasks. Every member of the group shares the same access rights when having to modify a peer’s transaction, as they’re all part of the same group (or security loop).
Financial Restrictions
Beyond individually-based restrictions applicable to viewing and modifying amounts and prices, maestro* provides functionalities that allow additional control.
Approval Process
There’s a functionality in maestro* called Workflow Management that allows users to set up various mechanisms to obtain approvals and alert specific key players. This option sends an email or a text message to one or several recipients regarding a particular operation, for instance, a goods receipt totalling over $50,000. Many scenarios can be configured to adequately meet your needs.
Guide Access
Guide is a Web portal intended for all maestro* and maestro*MOBILE users. The portal allows users to access maestro* updates, create tickets to get help from Maestro's Software Support, and, most importantly, to access the maestro* documentation (how tos, technical references, maestro*EXPRESS, etc.) available to clients to solve problems or errors encountered with the software. A username and password for each user is necessary to access the portal and determines the user's access type. These are allocated by the Software Support team.
|
|
|
|---|---|
|
|
The User level allows viewing various Guide topics and documents. It’s the level assigned to the majority of maestro* and maestro*MOBILE users. People in this level are not authorized to create tickets, follow up on them, or contact Maestro’s Software Support. |
|
Assistant - Download Assistant - Tickets and downloads |
The Assistant level (also called Assistant Administrator) enables users to view documents and access some functionalities (downloads and adding tickets) based on the selections mades when their profile was created. |
|
|
The Administrator level provides access to all Guide options and functionalities. It allows to view documents, download updates, create/view tickets, contact the Software Support team, and authorize the addition of new users. |
|
|
Only Maestro's Software Support can create accounts and assign access. |
Security Limitations
Despite all the functionalities set up in maestro*, security remains an aspect where vigilance is always required. Any smart alec could obviously decide one day to view project information and/or show interest in tables used to generate reports, lists, and pivotal analysis – and access them to drill down or infer to finally figure out the host of some static information.
|
|
Table “ ...A table is a set of data elements (values) using a model of vertical columns (identifiable by name) and horizontal rows, the cell being the unit where a row and column intersect.” Source: https://en.wikipedia.org/wiki/Table_(database) September 26, 2020 |
|
Appendix – Password Management Best Practices
|
The maestro* access is protected by a password. It is essential for all users to select it wisely and adopt safe practices. After all, it’s the organization’s data that is at stake! Here are the recommended practices: |
|
- A password should not be known information
It can never be stressed enough: nobody should be able to guess a password. Too often, number sequences, birth dates, and words surch as “welcome”, “hello”, “password”, etc. are used. In short, any word that can be linked to you by others or that have a simple semantic meaning must be avoided.
- A password should be modified at the slightest suspicion
A serious business or organization will never ask you to give them your password by email or by phone. If there’s a doubt, the password should be changed as soon as possible.
- It is recommended to regularly change your password
Work-related passwords (computer, session codes, etc.) should be changed every three months as they generally are sensitive information.
- A password must be strong and complex
Probably one of the most important instructions is to use a password that is uncommon or hard to decipher by pirates. It is essential to create strong codes. To do so, create password that :
- have a minimum of 12 characters
- are a mix of upper- and lower-case letters
- include special characters (examples: &”#_^) and numbers.
A strong password must be composed of 4 different types of characters: upper case, lower case, number, and ponctuation mark or special character (€, #...).
Also avoid simple logical sequences such as 123456, azerty, abcdef, etc. that appear on most common passwords lists and are the first combinations cybercriminals will try to crack your accounts. In addition, never use common expressions, song titles or lyrics, film titles, or quotes.

“For the seventh year in a row, 123456 topped the Worst Passwords List produced by internet security firm SplashData.”
French Canadian Broadcasting Corporation, released on December 19, 2019
Some methods to create a strong password
- The first letter method: Beatles - Yesterday, all my troubles seemed so far away, which provides B-Y,amtssfa;
- The phonetic method: doctor enaba 5 E.T, which provides drEnaba5Et;
- The Schneier method: Where oh where is my pear? Oh, there, which provides W?ow?imp::ohth3r;
- The method involving four or five randomly selected words, such as good horse tack battery;
- The method that includes a foreign language word, by instance good cheval tack battery.
NOTE: Above all, avoid using predictable techniques such as replacing an “E” by “3” or “a” by “@”. Such techniques give a false impression of security and make the password very vulnerable to automated guessing attempts attacks.
- A password must be confidential; it should never be shared!
There are many occasions where someone may be tempted to share a password: a trustworthy colleague forgot his own, and is looking for a quick way to save time, etc.Would you share your PIN that easily?
PIN
PIN means Personal Identification Number. A PIN is a confidential code consisted exclusively of numbers that is used to authenticate the holder of a chip card (debit or credi card, for example).
- A password should only be used for a single account and a single software
It’s recommended to use separate passwords for each account even if they all belong to the same person. Hackers will be quick to use your Facebook password to crack your other accounts, be it Twitter, Instagram, email, etc. It is however possible to use the same pattern and change the numbers or special characters according to the platform or software. Devices will be just as hard to crack than completely different passwords.
- Password should not be centralized in a document, whether soft or hard copy
Who never scribbled a password on a scrap of paper? Even though many people do it, it doesn’t mean that it’s a behaviour that should be copied. :-) There now exist password managers that fill this purpose while providing much more security.
Password Managers
These tools, also called “password vaults”, help centralize passwords in a secure way (files are encrypted). The files can be accessed through a super password.
The best known password managers are KeePass, ZenyPass, and Password Safe. Other tools also receive high marks from specialized sites, like Dashlane or LastPass.
The key however is to remember the super password and protect it properly by avoiding unsafe Internet connections!
- Avoid reusing a password
Though it may be tempting to reuse a password, this practice is strongly discouraged.
|
|
To learn more about recommended practices for password management, refer to: https://www.canada.ca/en/government/system/digital-government/online-security-privacy/password-guidance.html |
https://www.economie.gouv.fr/particuliers/creer-mot-passe-securise