Estimating
OBJECTIVE
Estimates are used to provide written conditions and commitments for providing a product and/or service in accordance with a customer's requirements.
This function is used to create two types of estimates:
- Construction (associated with projects);
- Distribution (associated with customer orders).
This procedure applies only for construction estimates.
|
|
Using Security Management in the Access Restrictions tab, you can restrict access to the various tabs and options of the Estimating module. |
|
|
Warning: Data updates for the various items and options related to Estimating is performed as follows:
|
PREREQUISITE
- Configuration - Project
- Estimate Status Codes Table
- Define Estimate Types
- Customer Management
- Supplier Management
- Catalogue Management
- Resource Management
- Define Assemblies
- Contact Management
Summary
To view a specific section, click one of the following links:
Estimate Selection Window
This window is used to:
- create a new estimate, template or assembly
- open an existing estimate, template or assembly
- search for an existing estimate, template or assembly
- quickly view estimates based on their status
- export information from estimates to an Excel file (right mouse button/Transfer to Excel).
Icons
Icons of the Selection window
|
Icon |
Title |
Description |
|---|---|---|
|
|
New (F5) |
Creates a new Estimate, Template or Assembly. |
|
|
Accept (F12) |
Opens the estimate selected in the current list. |
|
|
Delete (CTRL+F5) |
Deletes the estimate selected in the current list. |
|
|
Print (CTRL+P) |
Generates estimate lists. For more information, refer to the List Generator help topic. |
|
|
Display the first record (CTRL+F3) |
Displays the first estimate in the list. |
|
|
Display the previous record (F3) |
Displays the previous estimate. |
|
|
Display the next record (F4) |
Displays the next estimate. |
|
|
Display the last record (CTRL-F4) |
Displays the last estimate in the list. |
|
|
Display Entered Estimates |
Displays estimates with A - Contemplated status. NOTE: If additional statuses are created in the Estimate Status Codes Table, maestro* displays the estimates with a status represented by the codes A to F inclusively. |
|
|
Display Proposed Estimates |
Displays estimates with G – Proposed status. NOTE: If additional statuses are created in the Estimate Status Codes Table, maestro* displays the estimates with a status represented by the codes G to K inclusively. |
|
|
Display Refused Estimates |
Displays estimates with L - Refused status. NOTE: If additional statuses are created in the Estimate Status Codes Table, maestro* displays the estimates with a status represented by the codes L to O inclusively. |
|
|
Display Accepted Estimates |
Displays estimates with P - Accepted status. NOTE: If additional statuses are created in the Estimate Status Codes Table, maestro* displays the estimates with a status represented by the codes P to U inclusively. |
|
|
Display Transferred Estimates |
Displays estimates with V - Transferred status. This status is automatically assigned by maestro* if an estimate was transferred using the Final Transfer option. NOTE: If additional statuses are created in the Estimate Status Codes Table, maestro* displays the estimates with a status represented by the codes V to Z inclusively. |
|
|
Display Dispatched Estimates |
Displays estimates with 3 - Dispatched status. |
|
|
Display Completed Estimates |
Displays estimates with a 4 - Completed status. |
|
|
Show Template Estimates |
Displays only estimates with a 2 - Template status. |
|
|
Display Assemblies |
Displays only estimates with a 1- Assemblies status. |
|
|
All Estimates |
Displays all estimates in a single list, regardless of their status, including estimate templates and assemblies. |
|
|
Configuration |
Gives access to the next 2 options, useful for big estimates:
|


Access an Estimate
|
Requirement |
Actions |
|---|---|
|
Open an estimate |
Double-click on an estimate or Select an estimate and click the Accept icon (F12) or Select a line and press the F12 key on the keyboard. NOTE: When the window opens, maestro* displays by default estimates with the Contemplated status. |
|
Create a new estimate |
Click the New (F5) icon. |
|
Create a new assembly |
Refer to the help topic under Define Assemblies |
|
Create an estimate template |
Refer to the help topic under Define Templates. |
Estimate Window
This window is divided into two sections as illustrated below:
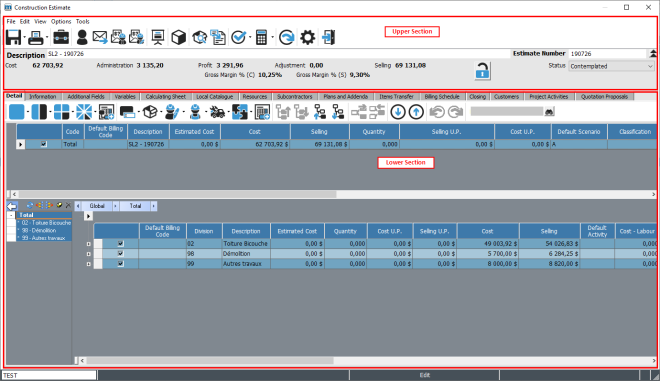
Upper Section of the Esimate Window
This section contains the basic menus, icons for various estimate options and general information on the estimate.
|
|
The Tabs Configuration option in the View menu lets you display/hide tabs as required. Right-clicking on tab titles offers the same functionality. |
Icons of the Estimate window
Click here to ![]() display Estimate window icons.
display Estimate window icons.


Access Path
|
maestro* > Projects > Estimating > Processing > Estimating |
Fields
Complete the information related to the estimate:
|
Field |
Description |
|---|---|
|
Description |
Summary description to identify the estimate. Available when searching the Estimate Selection window. |
|
Estimate Number |
Number of the estimate. NOTE: If an estimate type has been entered and automatic numbering was specified, the system assigns a number to the estimate when it is saved. |
|
Status |
Status of the estimate. NOTE: New statuses can be created in the Estimate Status Codes Table. |
|
Cost |
Total cost amount of the estimate, excluding Administration, Profit, and Adjusment amounts if entered in the Closing tab. It represents the sum of the costs for levels of the Detail tab. Maestro* adds the Estimated Cost amount of the level to the Cost amount of the estimate when there are no other costs in the level (i.e. items). As soon as there is one element with a quantity and a unit cost price, the system no longer takes into account the Estimated Cost amount, which becomes informative only. |
|
Administration |
Displays the final administration amount according to the information in the Closing tab. Calculation performed: Administration = Cost * Administration% |
|
Profit |
Displays the profit amount according to the information in the Closing tab. Calculation performed if the Profit Calculation Mode is set to Markup in the Information tab: Profit = Cost * (1 + Administration%) * Profit% Calculation performed if the Profit Calculation Mode is set to Profit in the Information tab: Profit = Selling – Cost – Administration Profit % = (Selling – (Cost*(1+Administration%)))/Selling |
|
Adjustment |
Amount added to or subtracted from the profit in the calculation of the estimate Selling amount. NOTE: The adjustment may represent a discount as well as a strategic upward adjustment. |
|
Selling |
Selling amount (without taxes) including Administration, Profit, and Adjustment amounts. Calculation performed if the Profit Calculation Mode is set to Markup in the Information tab: Selling = Cost * (1 + Administration%) * (1 + Profit%) Calculation performed if the Profit Calculation Mode is set to Profit in the Information tab: Selling = (Cost + (Cost * Administration%))/(1 - Profit%) The padlock icon can be locked/unlocked manually unless the estimate is saved with the Accepted status.
|
|
Gross Margin % (C) |
Percentage representing the gross margin between the Selling amount and Cost amount, in relation to the Cost amount. Calculation performed: Gross Margin % (C) = (Selling – Cost) / Cost * 100 % |
|
Gross Margin % (S) |
Percentage representing the gross margin between the Selling amount and Cost amount, in relation to the Selling amount. Calculation performed: Gross Margin % (S) = (Selling – Cost) / Selling * 100 % |
|
|
Icon indicating that the Selling amount is locked and which allows it to be unlocked, if the estimate status is not Accepted. |


Lower Section of the Estimate Window
Tabs
The lower section contains the various tabs for the estimate. They are essential for preparing an estimate, sending it to the customer and transferring it.
Fifteen tabs are listed in this section; the most important are shown in bold type:
|
|
The table presents the tabs in the order they are displayed by default in maestro*. When opening the Construction Estimate window, the Detail tab is displayed always first. You can display, hide and/or change the order of tabs by clicking the right mouse button on the tab name, or by using the Tab Configuration option in the View menu. These settings are stored by user. To make this document easier to read, links have been added to access sections that require additional explanation. |
|
Tab |
Description |
||||
|---|---|---|---|---|---|
|
List of the elements in an estimate. |
|||||
|
Includes the general information on an estimate, such as customer contact information, methods for calculating costs, selling prices and profit, etc. The tab is divided into eight sections: |
|||||
|
Summary of all resources in the Detail tab AND with a quantity oher than zero. |
|||||
|
Variables |
Used to create variables that will be available in the Quantity column of all items of the Detail tab for calculations. Refer to the How To Creating Variables and Program Calculation Formulas. |
||||
|
Calculation Sheet |
This tab makes it possible to integrate an Excel file in which can be found, for example, quantity takeoff statements, price lists, conversion factors lists, supplier or subcontractor price comparison tables, etc. The data of the Calculation Sheet is available to supply the calculations in the Quantity column of all elements under the Detail tab. |
||||
|
Local Catalogue |
Lists the catalogue items of the estimate, by product (item) or by product type. This tab is useful for:
|
||||
|
Items Transfer |
Used to create lots of items and define for each of them the level of detail and transfer destination (resources per project, requisition, stock order from catalogue). |
||||
|
Summary of all subcontractors in the Detail tab, whether selected or not, and whether they have a quantity or not. This tab lets you:
|
|||||
|
Additional Fields |
Used to create additional fields for entering information about the estimate and for which no fields in the estimate contain this information. |
||||
|
Quotation Proposals |
Information about submitting the estimate, for information purposes. This information does not affect the estimate and is not transferred, but can be printed on customized forms or put into an analysis table created from the List Generator. |
||||
|
Plans and Addendas |
Information on plans and addendas used to produce the estimate (budget), for information purposes. This information does not affect the estimate and is not transferred, but can be printed on customized forms or put into an analysis table created from the List Generator. When the tab is completed, it lets you:
|
||||
|
Includes project structure activities to create the budget when transferring the estimate. |
|||||
|
Closing |
This tab finalizes the estimate. It is part of the closing phase of the estimate and consists of:
|
||||
|
Billing Schedule |
Enables information to be structured for presentation to the customer in a different format to that of the estimate/budget (Detail tab). |
||||
|
Summary of customers to which the current estimate is sent. This tab is used when the estimate is to be sent to multiple customers. It makes it possible to:
|
Table of Keyboard Shortcuts
The following table describes some of the keyboard shortcuts available.
|
Key |
Function |
|---|---|
|
CTRL + S |
Adds an empty subcontractor line to the end of the list of subcontractors at the current level. |
|
CTRL + I |
Adds an empty item to the end of the list at the current level. |
|
CTRL + R |
Adds an empty resource line to the end of the list at the current level. |
|
CTRL + E |
Adds an empty equipment resource line to the end of the list at the current level. |
|
CTRL + L |
Adds an empty labour resources line to the end of the list at the current level. |
|
CTRL + M |
Adds an empty assembly line to the end of the list at the current level. |
|
CTRL + C |
Copy a line so it can be pasted elsewhere later. |
|
CTRL + V |
Paste a copied or cut line. |
|
CTRL + X |
Cut a line to paste it elsewhere (move). |
|
CTRL + Z |
Cancel the last action. |
|
CTRL + F6 or Delete |
Delete one or more lines. |
|
CTRL + Y |
Redo the last action that was canceled. |
